Thursday, January 27, 2011

Eagle Birthday Card


I took sometime yesterday to get a start on the sketch challenge.  My #2 son has a birthday next week and I need to get his card mailed off so it will get to him on time at college. I must of bounced back and forth for a few hours before I decided to stay with the sketch and how I was going to put it together.  I had it all stamped and laid out and then someone threw the mail on my desk and whoosh pieces were every where.  So when I got up this morning I decided to start gluing things together before I had to run the boys to instrument lessons. The eagle was stamped and then run through the Big Shot with the die.  I have had the clear rectangle die for a while and have never used it.  Boy, was it easy!  I could see the image so I knew the image would be centered. I stamped another eagle and then cut around him as close as I could get.  I layered it as perfect as I could on top on the on in the rectangle with Dimensionals cut to fit. I do not think there was an edge that I did not sponge, as usual.  I do need to play with the Letterpress plates more.  I read somewhere that different papers make a difference...just need to give them a try.  Off to get this in the mail before I run the boys to basketball practice.

Card Details:
Stamps: In Wilderness, En Francias Background
Paper: Chocolate Chip, Naturals Ivory, Garden Green
Ink: Chocolate Chip
Accessories: 2 Step Bird Punch (leaves), Big Shot, Scallop Rectangle Die, Backgrounds 1 Texturz Plate, Northern Trim Letterpress Plate, Mini Library Clips, Brass Eyelets, Dimensionals


Photobucket

Monday, January 17, 2011

MDS Contest Card


Here is the MDS Card I submitted to the SU's MDS contest. Once again the winners can be seen here.  I spend a lot of time with my kids as the taxi driver so I have a lot of sit and wait time on my hands.  This does not allow me much time to design and stamp.  I do most of my work on my laptop so it is great to be able to use MDS to design a card before I make it in my "waiting" time.  This digital card was made into this one when I did have the time  to stamp.  If you have any questions about MDS either with this card or any other question, just post it in the comment section or send me an e-mail.  I love to help!


Photobucket

Friday, January 14, 2011

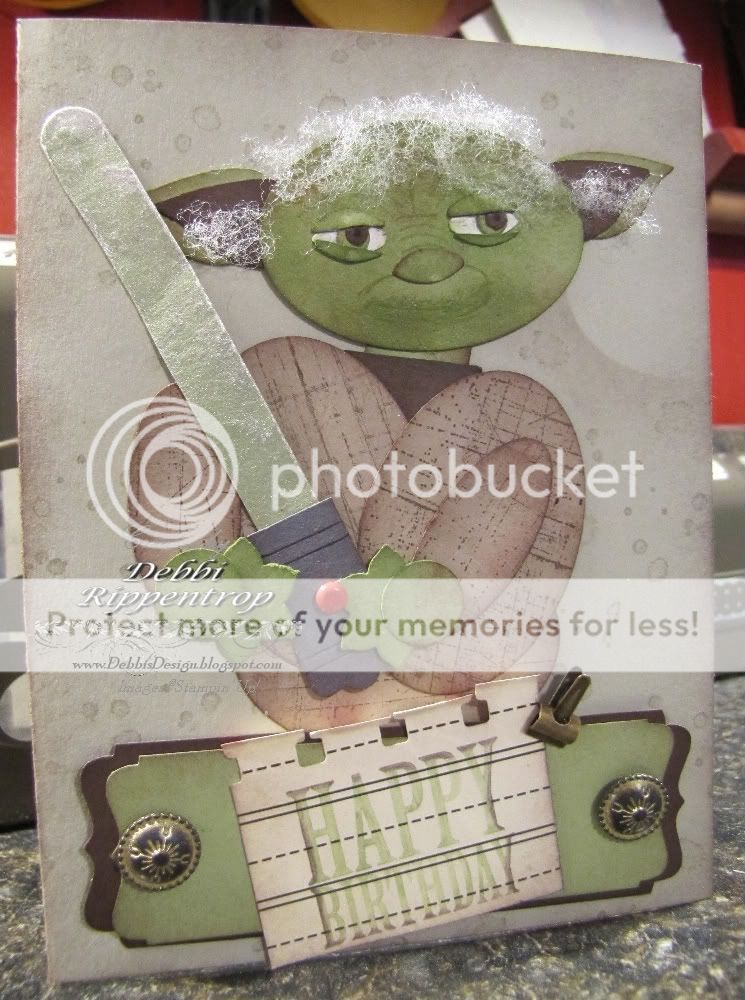
Yoda Punch Card

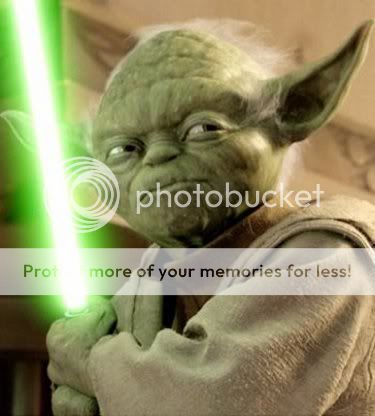
Well, today is the Birthday of my one of my son's best friends.  His mother is a very dear friend of mine and also a fellow paper crafter.  When I asked him if he had any ideas that he would like for a gift and a card he reminded me that Ryan loved Star Wars.  My son, Levi, loves punch art and asked me if I would be able to do a Star Wars punch art card.  After all of the time I had spent on my Noah's ark one I did not know if I was up to the challenge.  So days pass and he reminds me that the party is coming up really fast and asks if I had gotten around to the Yoda card.  So now it is not just Star Wars but a Yoda card.  So I did a google search and found this picture of Yoda to work from.


So I sat down and got to work.  All of my punches are either hanging on my wall (older version) or sitting on my desk (new version). So it was just a look around to see what would go together.  I tried to look at the image to see what would be the hardest to do and I found that to me it would be the eyes...so that is where I started.  I figured if I could not get the eyes to look right I might as well scratch it and start something else.  I looked at my punches and thought the end leaf on the Two Step Bird Punch would be just the right size for the eyes. So I punched the Whisper White and the Pear Pizazz (the color I thought would make the best Yoda) with the end of the leaf.  The eyeball parts are punched with the small and large of the Crop-a-dile (that thing is more handy then I ever thought it to be :) )  I just used my marker to put a black circle in the center of the Chocolate Chip.  The ears are from the same punch.  I just used the wing.  I did have to trim the Chocolate Chip just a smidge to get it to layer the way I wanted it to.  I used the same area of the leaf again for Yoda's button nose.  His fine white hair is the stuffing out of an old pillow I was throwing away.  One of my biggest delimas was how to get the light saber to glow.  My 8 year old daughter said "Why don't you just spray it with your shiny spray?"   Duh!  So I used the Vanilla Shimmer Smooch Spritz to give it some glow.


For my sentiment I wanted something fancy that went about the whole width of the card.  I cut my cardstock 11/4" wide and put it into the back of the Decorative Label Punch as shown above.  I did each end this way.  I trimmed the Pear pizazz just a smidge thinner so I could layer it.  I think that I once again sponged every angle I could get at.  I did have to use my tweezers to sponge and assemble the eyes but other than that it went together pretty easy.

 
I tried to make the background "Spacey" without being too cluttered.  So I sponged in a moon and added "stars" with the blotches from the French Foliage set. My son is very happy with how it turned out.  He cannot wait until the party next weekend!

May the Force be with You!

Card Details:
Stamps: Afterthoughts (Level 1 Hostess Set), French Foliage, Sanded Background
Paper: Sahara Sand, Pear Pizazz, Chocolate Chip, Whisper White, Crumb Cake, Basic Gray, Love Letter DSP
Ink: Pear Pizazz, Chocolate Chip, Sahara Sand
Accessories: 
Sentiment: Decorative Label Punch, Antique Brads, Spiral Border Punch, Mini Library Clips

Yoda's Head: Wide Oval Punch, Two Step Bird Punch, Pillow Stuffing, Markers for lines, Sponges for shadows
Yoda's BodyWide Oval Punch (3), Small Oval Punch (2), Hands: Boho Blossom Punch, 1/2" Circle Punch
Light Saber: Word Window Punch, Vanilla Shimmer Smooch Spritz, Modern Label Punch, Red Brad


Photobucket

Wednesday, January 12, 2011

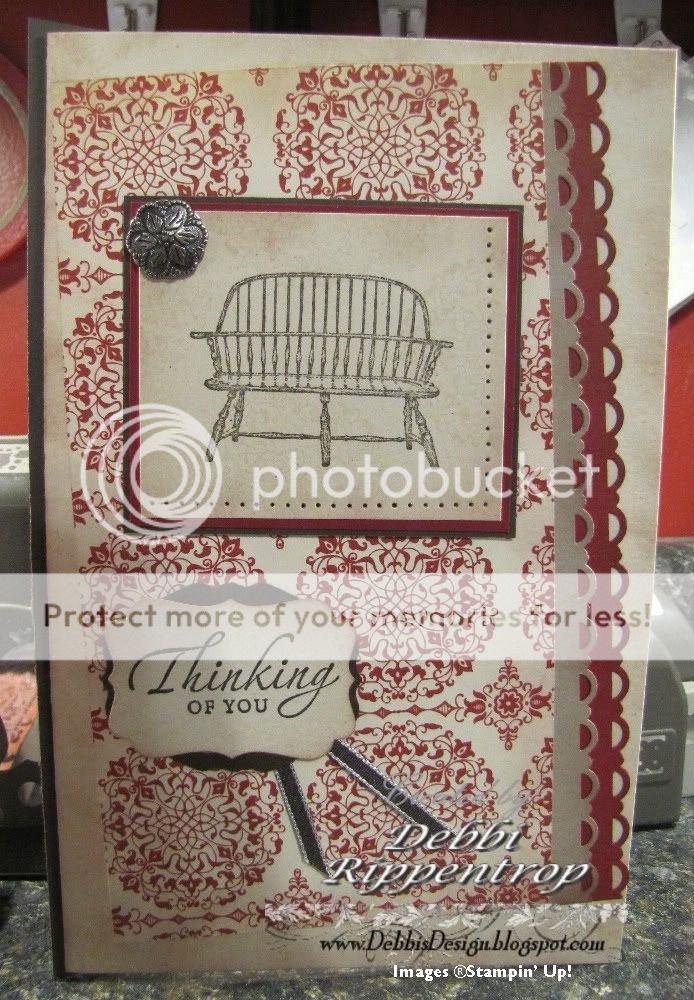
Sympathy Card


My husband called one afternoon and asked if I could whip up a sympathy card for him.  A co-worker's mother had passed away and they needed a card 50-60 people could sign. So this is what I came up with.  I received the Have a Seat set for a Christmas gift and I thought the empty bench would be symbolic on this card.  This is a 5.5" x 8.5" card.  I mounted a slightly smaller card on a 5.5" x 8.5" card base to bring more of the Early Expresso together.  I love, love, love the Love Letter DSP.  I love that I can sponge it or brayer it to change the lighter areas to be any color that I wish.  It is great also to sponge the edges to give more of a vintage look, which is what I was going for on this card.  The Antique Brads are great.  My problem is I hate to use them because they will eventually be gone.....I will not hoard the antique brads,I will not hoard the antique brads,I will not hoard the antique brads! 


Card Details:
Stamps: Have  Seat, Sincere Salutations
Paper: Early Espresso, Crumb Cake, Cherry Cobbler, Naturals Ivory, Love Letter DSP
Ink: Early Espresso, Cherry Cobbler (Sponged)
Accessories: Big Shot, Decorative Label Punch, Scallop Trim Border Punch, Lots of Tags Sizzlet Die, Antique Brads,  Early Espresso Taffeta Ribbon, Piercing tool for paper piercing

Photobucket

Monday, January 10, 2011

Contest Page-MDS

A while back, while I was still recovering from my surgeries, SU ran a MDS contest.  We were to submit two MDS pages and a MDS card.  Here are the winners.   No, I am not on the list and after looking at the pages I can see why.  They are wonderful!  I did enjoy creating these pages and would not change a thing on either page.  I used MDS and only MDS and only SU products as specified in the rules.  I put the pages together here so that they would be easier to see.  If you want a close up look just click the image and it will open larger in a new tab.  I will post the card I submitted on my next MDS Monday post.


Photobucket

Wednesday, January 05, 2011

Punch Art Noah's Ark

My Brother-in-Law has a birthday next week.  Since I did a punch art card for his daughter last week I figured it would be fun to do one for him too,  So I did a gallery search at www.Splitcoaststampers.com and found this Noah's Ark card that I worked off from.  It took me most of the day and got a bit carried away...but could not stop.  This is a full size card (5.5" x 8.5").  It is hard to see but I used tore paper and sponges to make the sky background.  I think every edge is sponged except for the Whisper White.  I will do my best to list all of the punches I used for each...forgive me if I miss any!

Card Details:
Stamps: Woodgrain Background, Inside-Well Scripted, Whimsical Words (2010 SAB set)
Paper: Early Espresso, Bashful Blue, Pretty in Pink, Whisper White, Basic Black, Wild Wasabi, Chocolate Chip, More Mustard, Crumb Cake, So Saffron
Ink: Early Espresso, Marina Mist, Blushing White, Wild Wasabi, Chocolate Chip, More Mustard, So Saffron
Accessories: 
Ark-Freehand cut ark, Rail-Jewelry Tag punch, Door Knobs-Itty Bitty Shapes Circle Punch

Noah-Freehand cut body, Sash-Large Oval Punch, Hands- 1/2" Circle Punch, Boho Blossom Punch, Head-Large Oval Punch, Scalloped Oval Punch, Itty Bitty Shapes Circle Punch, 1" Circle Punch, Crop-a-dile, Swirly Die, Big Shot
Lion- 1-3/4" Scallop Circle Punch, Two Step Owl Punch, 3/4" Circle Punch, Itty Bitty Shapes Circle Punch, Crop-a-dile
Bear-1-3/4" Scallop Circle Punch, Two Step Bird Punch wing for ears, 1-1/4" Circle Punch, 3/4" Circle Punch, Itty Bitty Shapes Circle Punch, Crop-a-dile, Wide Oval Punch, Large Oval Punch, Scallop Oval Punch, Word Window Punch, 1/2" Circle Punch, Boho Blossom Punch
Dove- Two-Step Bird Punch
Giraffe- Large Oval, Small Oval, Two Step Bird Punch wing for ears, Itty Bitty Shapes Circle Punch, Crop-a-dile, 1/2" Circle Punch,

Photobucket

Monday, January 03, 2011

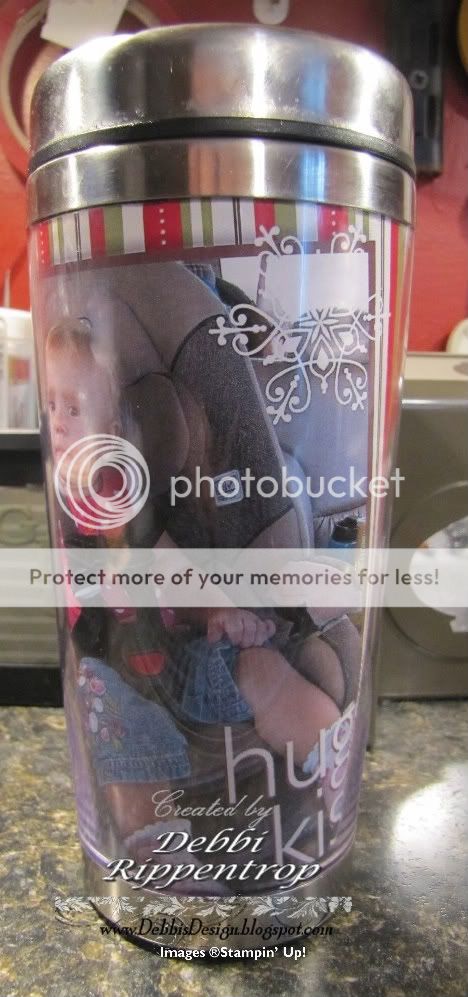
Travel Mug MDS


I bought a travel mug that I can replace the liner in.  My Son, Daughter-in-Law and only grandchild live 8 hours away so I love to change it up with pictures of my grand-daughter.  I whipped this up in My Digital Studio one night and was all ready to take with me the next morning.  I took lots of new pictures over Christmas so I will have to make a new one soon.


Photobucket

Friday, December 31, 2010

Happy Birthday Sophia

  
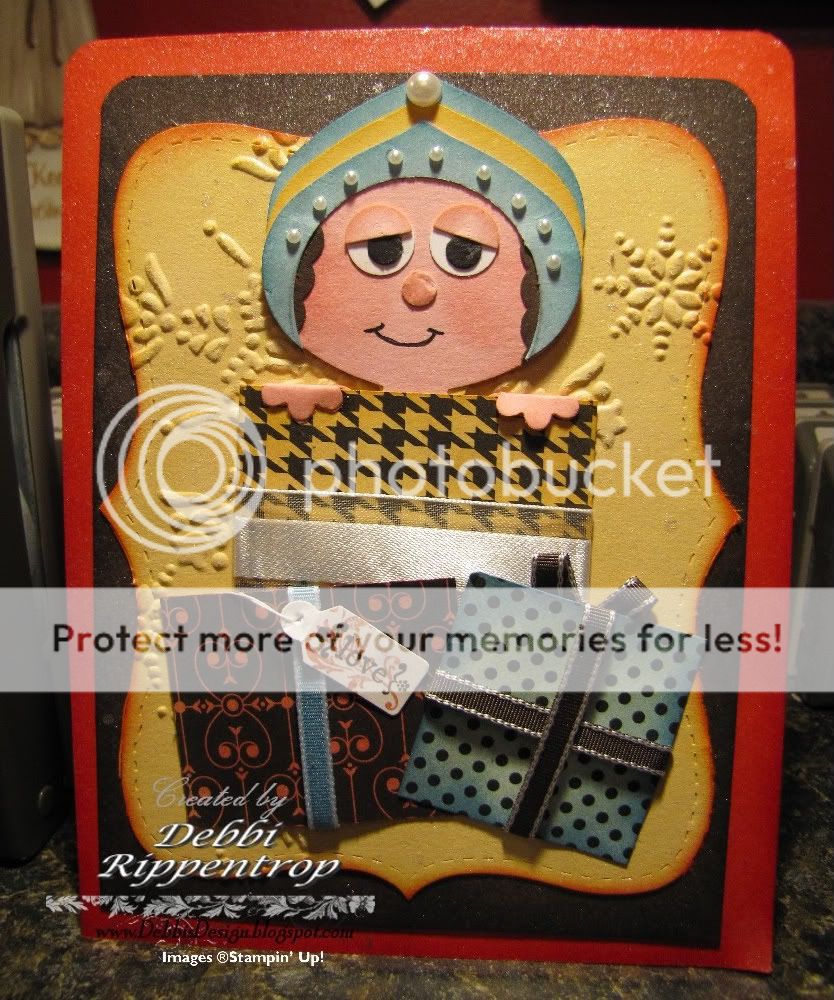
Today is my niece's 3rd birthday. I wanted to make a very special card for her. I saw a card on Andrea Walford's  site and just had to make one of the little people I have seen popping up everywhere. Since I received the Ornament Punch for Christmas I just had to give one a try.  I do not have a lot of designer paper so I decided to use Love Letter Paper and color it with ink pads and sponges.  So here is my little Sophia with pearls on her hat, lots of pretty presents and plenty of sparkle.  

Wishing you all a Very Happy New Year!

Card Details:
Stamps:Tiny Tags
Paper: Early Espresso, Poppy Parade, So Saffron, Pretty in Pink, Baja Breeze, Love Letter DSP, Whisper White, Basic Black
Ink: Early Espresso, Poppy Parade, So Saffron, Blushing Bride, Baja Breeze 
Accessories: Big Shot, Northern Fury Impression Folder, Top Note Die, Corner Rounder Punch, Ornament Punch, Circle from the Itty Bitty Shapes Punch Pack, Smallest circle was made with the Crop-a-dile, Jewelry Tag Punch, Hair-Dotted Scallop Ribbon Punch, Hands-Boho Blossoms, 5/8" Whisper White Organza Ribbon, 1/8" Taffeta Ribbon-Marina Mist, Early Espresso, Basic Pearls, Vanilla Shimmer Smooch Spritz

Photobucket

Wednesday, December 29, 2010

Happy Birthday Dad!

My Dad's Birthday was a few weeks ago, but I have not had the time to post his card so here we go.  My Father has admired and collected Bald Eagles for many years.  So when this set came out I knew I had to get it for the simple reason to make him cards..  I found though that this set is great for any many cards I need to make.  For the background I used the Decorative Label punch and I cut it in half for the top, bottom and sides.


Card Details:
Stamps: In Wilderness, Teeny Tiny Wishes
Paper: Confetti White, Early Espresso
Ink: Early Espresso
Accessories: Square Lattice Textured Impressions Embossing Folder, Decorative Label Punch, Word Window Punch, Modern Label Punch, Metallic Brad


Photobucket

Saturday, December 25, 2010

Merry Christmas 2010

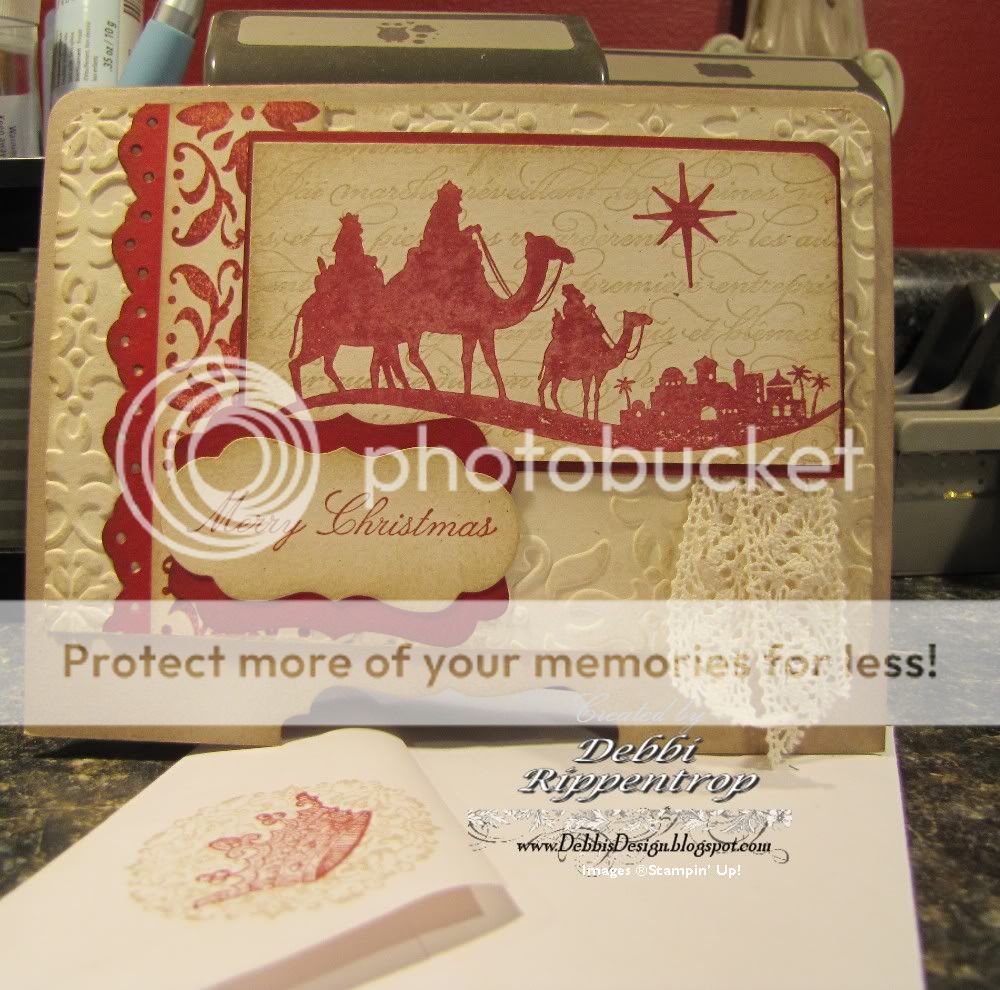
Merry Christmas!!! I have not had much time to stamp the last few months because I have been working on these Christmas cards.  My boys have instrument lessons and basketball practice so I sit in my truck on an average of 3 hours a day waiting for them.  I used a lot of that time for assembly.  I pray you all have a very Merry Christmas and that you celebrate the true meaning of Christmas. God Wants You to Know.  I wanted  a vintage look so I did quite a bit of sponging.  I think there was not one edge left unsponged.

Card Details:
Stamps: Come to Bethlehem, En Francais, Envelope-Artistic Etchings
Paper: Naturals Ivory, Cherry Cobbler, Crumb Cake
Ink: Crumb Cake, Cherry Cobbler
Accessories: Big Shot, Corner Rounder Punch, Vintage Wallpaper Textured Impressions Embossing Folder, Decorative Label Punch, Lots of Tags Sizzlit Die, Eyelet Border Punch, Crochet Victoria Trim Ribbon


Photobucket

Monday, November 08, 2010

Wolf Birthday

This is a card that was sent off to my son for his birthday.  Today, 25 years ago, I became a mother for the first time.  Now my son has his own house & family and I am so thankful for the man he has become.  Happy Birthday Heath! I did a very simple card for him...and no pearls :(  I cut the back panels, stamped them, sponged them and ran them through the Big Shot.  The Jumbo brad needed a back up to make it show better and the circle punch was the perfect size.  My other son said the sentiment looked like a bone and so it went very well together...;-)  To do the background behind the wolf I had read some where that the new clear blocks worked great for this and so I gave it a try.  The only problem I had with this is I did not want to get the clear block dirty.  It washed up just great so I survived. 

Card Details:
Stamps: In Wilderness, Teeny Tiny Wishes, Sanded Background
Paper: Early Espresso, Garden Green, Naturals White
Ink: Early Espresso, Pacific Point,
Accessories: Big Shot, Corner Rounder Punch, Square Lattice Impression Folder, 1" Circle Punch, Modern Label Punch, 5/8" Jumbo Brad, Punch Windows Die

Photobucket

Friday, November 05, 2010

Pacific Thank you

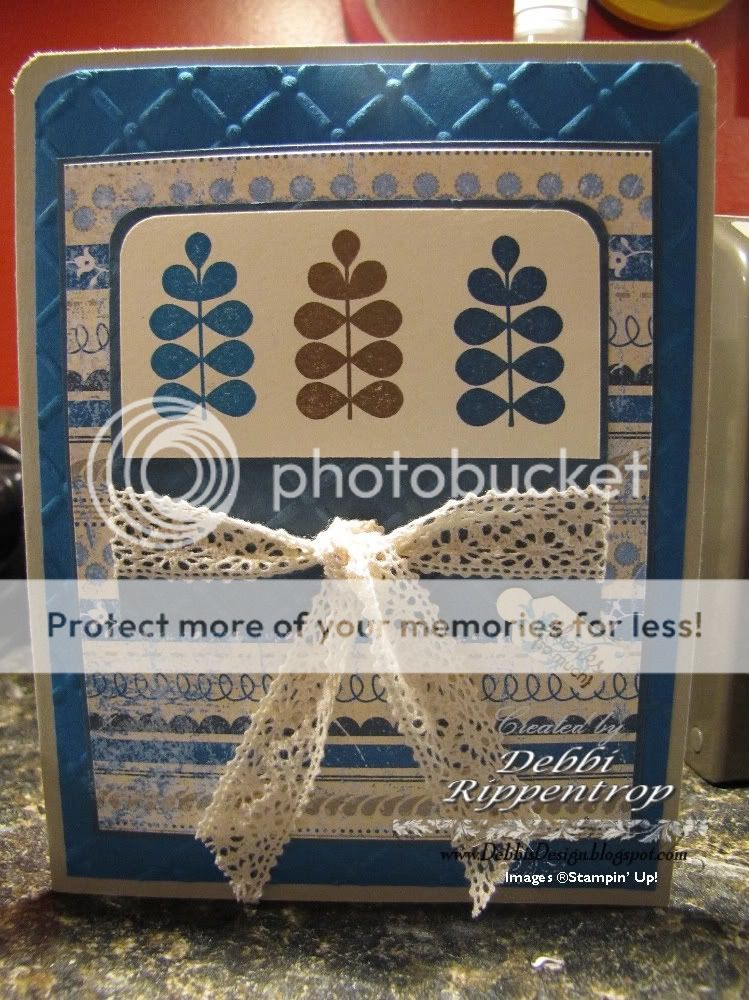
 I just love browns and blues together and thought his was a great color combo taken from the designer paper. Can you tell that I love it, I just cannot get away from it.  I know I saw this sketch on a blog somewhere and I am sorry if the credit is to go to someone specific.  It is an easy one that I know I will be using again sometime. This was a very simple stamp, layer, no sponging (wow!), punch, impress card.


Card Details:
Stamps: Funky Four, Tiny Tags
Paper: Pacific Point, Crumb Cake, Blueberry Crisp DSP, Very Vanilla, Not Quite Navy
Ink: Pacific Point, Soft Suede, Not Quite Navy
Accessories: Big Shot, Corner Rounder Punch, Perfect Details Texturz Plate, Victoria Crochet Trim Ribbon, Jewelry Tag Punch


Photobucket

Wednesday, November 03, 2010

Favorite Mushrooms

This was a set that was at the top of my want list when the catalog came out.  I thought these little mushrooms were the cutest.  I stamped them twice, once in Soft Suede and once in Pacific Point.  I then cut out some of the elements in Soft Suede and mounted them on top on the Pacific Point ones.  The pearls between the mushrooms...were meant to be.  (I smudged a finger print and had to cover it up....)  If you can see I added a few pearls inside the background impression too.  The sentiment design just came together too.   I love the way it turned out so fun!  This poor image was stamped and matted weeks ago and tried on various cards and I just could not get it to fit, so it just went back on the shelf to wait...until I finally came up with a home I think it is very happy on.

Card Details:
Stamps: Funky Four, Teeny Tiny Wishes
Paper: Pacific Point, Soft Suede, Very Vanilla
Ink: Soft Suede, Pacific Point
Accessories:  Big Shot, Elegant Lines Impression Folder, Pearls, Victoria Crochet Trim Ribbon, Dotted Scallop Ribbon Border Punch, Small Oval Punch, Large Oval Punch, 3/4" Circle Punch


Photobucket

Friday, October 29, 2010

Get Well

This was the first card that I was happy about in a very long time.  I think I had lost my creative mojo with all that has been going on.  I am still on some pretty strong pain meds while I am typing this post ( I made the card awhile back and had my son take the picture this morning) so if I make any errors I can blame them on that ;-).  As I sit here in my recliner looking across my bedroom at my work area (I cannot wait to get enough energy to get over there!) I see a pattern.  I have used the same color scheme in all of the cards that I have made the 2 weeks I had between my surgeries.  I love the Blueberry Crisp DSP and the colors that it comes in are great!

For the background on the Top Note Die I cut the paper in strips and glued them on a piece of scrap paper. I then ran it through the Big Shot and trimmed off the outer edge.  I then mounted it on the Crumb Cake and ran it through the Big Shot again with the Vintage Wallpaper Impression folder. I sponged Crumb cake across the top. The Pacific Point card base was stamped in Crumb Cake with the Sanded Background.  I sponged the edges of everything with Crumb Cake.  I am also addicted to the pearls and someone has to stop me from adding them to every card I make :).

Card Details:
Stamps: Aviary, Teeny Tiny Wishes, Sanded Background
Paper: Pacific Point, Crumb Cake, Blueberry Crisp DSP, Very Vanilla
Ink: Early Espresso, Pacific Point,
Accessories: Big Shot, Top Note Die, Corner Rounder Punch, Vintage Wallpaper Impression Folder, Victoria Crochet Trim Ribbon, Wide Oval Punch, Decorative Label Punch, Word Window Punch, Modern Label Punch, Basic Pearls


Photobucket

Thursday, October 14, 2010

Aviary Thank you

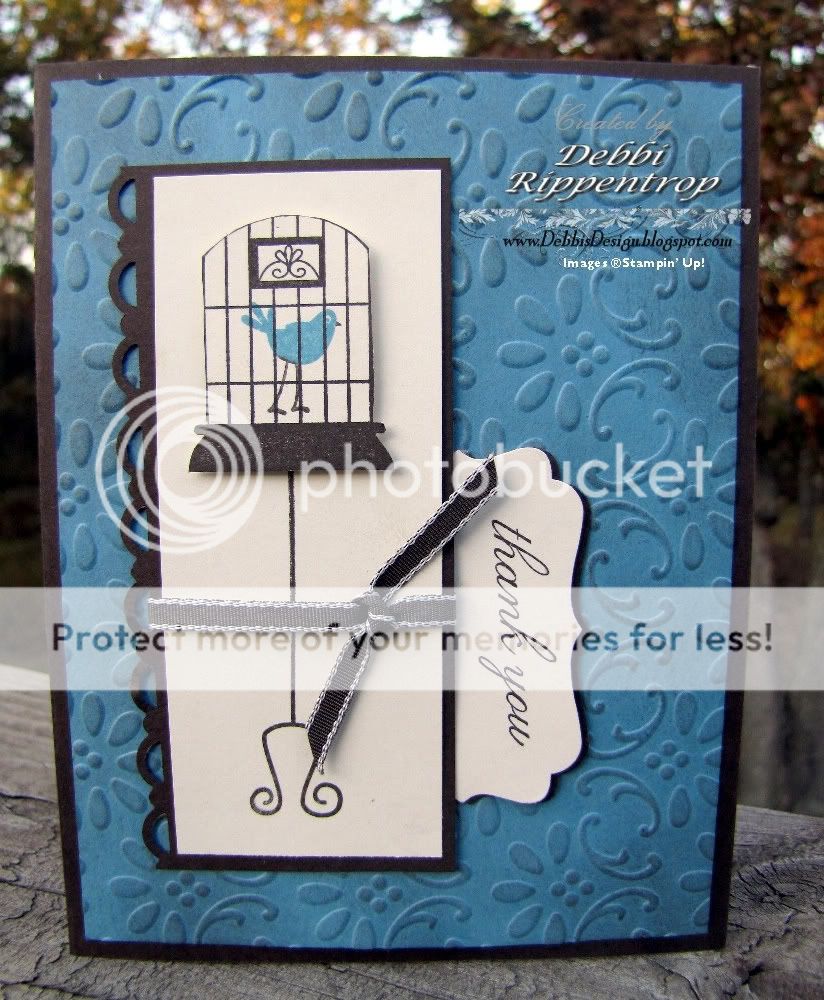
So I figured that I would try to get a card made before my surgery. I got one done and some parts for another couple started that I hope to get together and finished yet this week.  I love this set in the catalog but it has so many options that I want to do that I just could not figure out where to start.  So I kept it pretty simple.  I stamped the cage leg and used dimensionals to pop up the cut out cage.  I love, love, love the new decorative label punch from the mini and I know I will get my money's worth out of it.  I am going to need quite a few thank you cards in the next month.  I sponged across the card from with a bit Early Espresso Ink.

Card Details:
Stamps: Aviary, Because I Care (Hostess level 1)
Paper: Marina Mist, Early Espresso, Very Vanilla
Ink: Early Espresso, Marina Mist
Accessories:  Decorative Label Punch, Early Espresso Ribbon, Big Shot, Finial Press Impression Folder, Scallop Trim Border Punch, 1/8"  Early Espresso Taffeta Ribbon


Photobucket

Friday, October 08, 2010

Balloon Owls


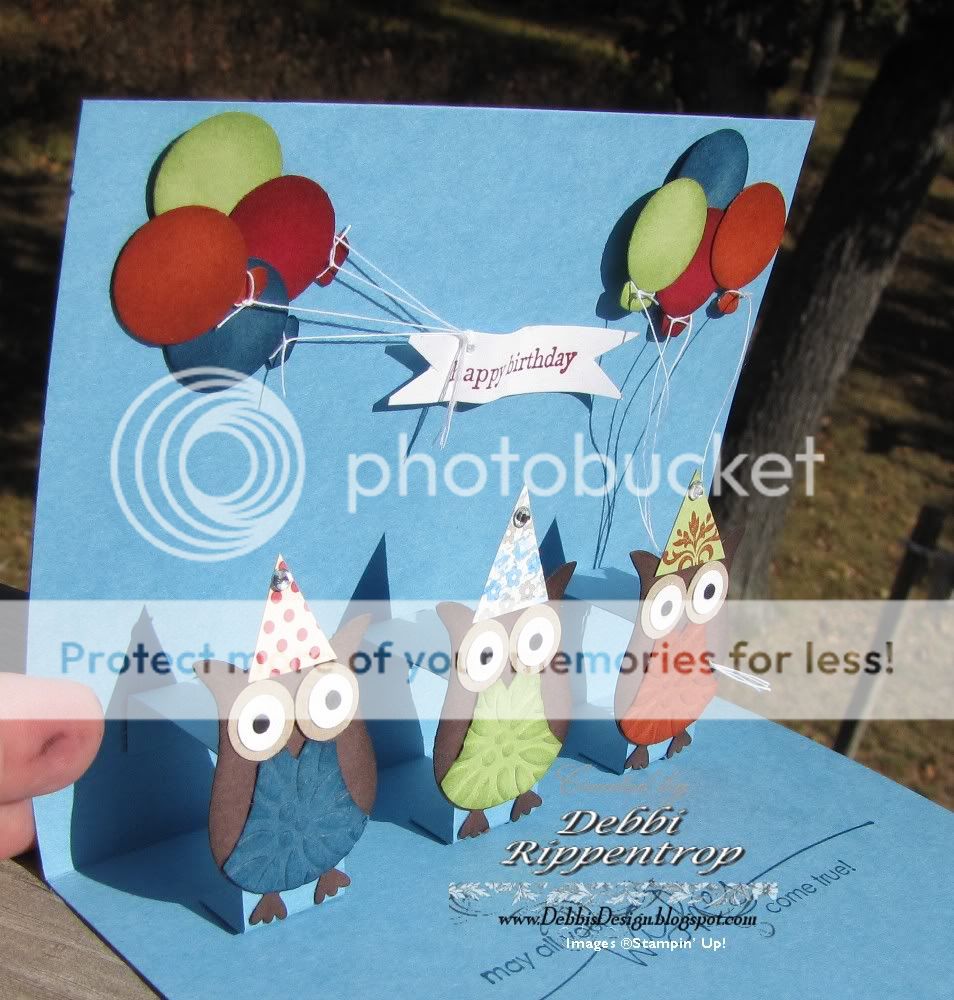
My daughter has a birthday party to go to tomorrow so I had to get a card made.  This one took me most of the week because my spare time is so sparse right now. When I saw this one on Splitcoast I know it was the one I wanted to do.  She asked if I could add a few balloons so that is just what I did ;)  I tore a piece of scratch paper and used my Whisper White Craft ink to create the clouds in the background.

The balloons are made with the 3/4" circle punch and a trimmed corner.  The hats I just free hand cut and she wanted some rhinestones added because all 9 yr old gilrs need lots of bling.

I chose not to cut the card but to just add legs for the pop up.  The hardest part was tying all of the thread to the balloons.


Stamps: Tiny Tags, Woodgrain Background, Heard from the Heart, Teeny Tiny Wishes
Paper: Marina Mist, Old Olive, Chocolate Chip, Crumb Cake, Cherry Cobbler, Not Quite Navy, Pear Pizazz, Cajun Craze, Whisper White, Basic Black
Ink: Early Espresso, Old Olive, Cherry Cobbler, Not Quite Navy, Lots of sponging with the matching colors
Accessories:  3/4" Circle Punch, Owl Punch, Bird Punch-Leaves, Wide Oval Punch, Jewelry Tag Punch


I am headed in for my first surgery on Monday so it may be a while before I can post again (unless I steal some time this weekend :)   )  Enjoy the beautiful fall weather and colors!

Photobucket
Related Posts with Thumbnails