Showing posts with label Wide Oval Punch. Show all posts

Tuesday, August 16, 2011

Need for Thank You-s


Our theme this year for Bible School was Rev it Up!  So I was very pleased when I saw the Need for Speed set in the new catalog.  I needed to make a bunch of Thank you cards for all of the volunteers so I put my kids to work punching and sponging. My 11 yr old son even cut out all of the cars for me after I stamped them.  What great helpers I have and I think the cards turned out great and were appreciated!

Card Details:
Stamps: Need for Speed, Tiny Tags
Paper: Pool Party, Island Indigo, Whisper White, Early Espresso
Ink: Early Espresso, Sponge-Pool Party, Island Indigo
Accessories:  Big Shot, Impression Embossing Folders: Stripes, Square Lattice, Perfect Polka Dots, Tasteful Trim Die, Petite Pennants Builder Punch, Extra Large Oval Punch, 3/4" Circle Punch, 1/2" Circle Punch


Photobucket

Tuesday, March 01, 2011

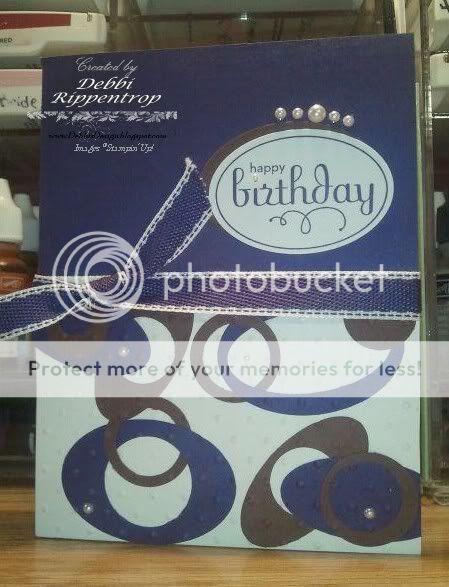
Oval Birthday

Once again I saw this concept on another blog but I did not bookmark it so I cannot point you back to it.  If it is yours or if you know where it came from please let me know so that I may edit and give proper credit.  I do believe the original card is pink and brown.  I punched out various ovals and circles and adhered them to the card.  I then ran the whole base through the Big Shot with the Perfect Polka Dots Folder.

Card Details:
Stamps: Perfect Punches
Paper: Concord Crush, Chocolate Chip, Whisper White
Ink: Concord Crush
Accessories: Big Shot, Perfect Polka Dots Impressions Folder, Wide Oval Punch, Small Oval Punch, 3/4" Circle Punch, 1" Circle Punch, Mini Circle Punch, Pearls, Concord Crush Stitched Poly Ribbon


Photobucket

Wednesday, February 23, 2011

Crowns

Wow, I got more time to make another card this week!  Forgive my photography but I cheated and took the picture with my phone...too lazy to get the big camera out.  When I saw the sketch this morning I knew I just had to do it.  So every spare minute I had between correcting, teaching and running the kids to music lessons I worked on it.  I knew I wanted to use the Concord Crush because my daughter has been asking me to use the ribbon for a very long time. To find the colors to go with it I used the Color Coach and i love the colors that they suggested.  This was a very simple card.  No sponging or fancy cutting just a couple of impression folders and crisp stamps.  What are crowns without a little bling?  These crowns where just crying to have rhinestones put on them so I also used them to dot the i's.  I trimmed every thing with white for two reasons. 1.) to make the ribbon match better and 2.) to make the colors cheerier.  I am seeing great possibilities for this set!

Card Details:
Stamps: Artistic Etchings, Bring on the Cake
Paper: Peach Parfait, Pear Pizazz, Concord Crush, Chocolate Chip
Ink: Peach Parfait, Pear Pizazz, Concord Crush, Chocolate Chip, Whisper White
Accessories: Rhinestones, Wide Oval Punch, Big Shot, Concord Crush 1/2" Stitched Poly Ribbon, Square Lattice Impressions Folder, Framed Tulips Textured Impressions Embossing Folder

Photobucket

Wednesday, February 02, 2011

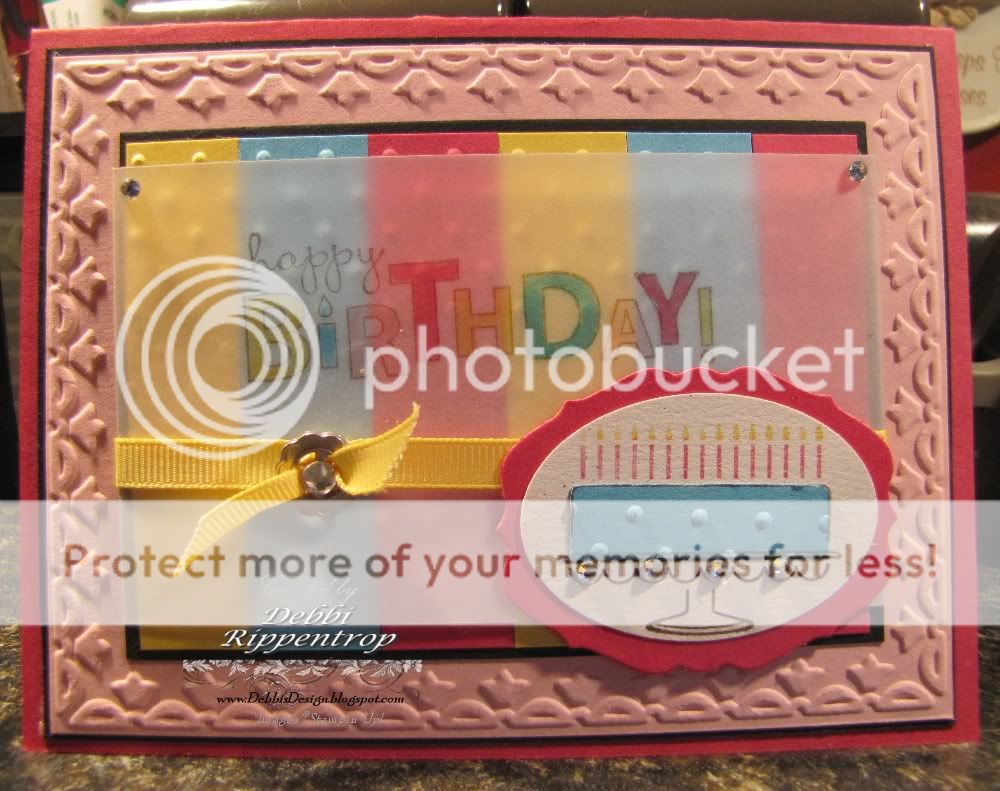
Rainbow Birthday Cake

My 8 year old Daughter needed a birthday card for a friend. She wanted it to be bright and very colorful.  She gabbed the new Color Coach and found the color she wanted dominate on the card.  He color was Melon Mambo.  She flipped over the card and it says to use Daffodil Delight, Pretty in Pink, and Tempting Turquoise as the go to colors.  So she go them all our for me and said "These are what I would like you to use Mom..." So I went to work.

Lucky for her I had just gotten my Sale-a-bration order in and was looking forward to working with some new things.  I have admired the new Framed Tulips Textured Impressions Embossing Folder Die.  I just had to put it on my first order and of course I had to use it on my first card.  The vellum adhesive is under the ribbon and the cake that way it is held on but not able to be seen.


She wanted lots of hardware and bling and I think she had gone through the whole catalog and picked everything out.  I let her pick out one piece for the Hardware kit and then she had to choose between the pearls or the rhinestones.  We added the small rhinestones on every other scallop on the cake stand, one in each top corner of the vellum and one large one in the center of the ribbon slide. The ribbon is two pieces, one is wrapped around the top layer and the other is tied and and the pulled through the ribbon slide.


Card Details:
Stamps: Bring On the Cake
Paper: Melon Mambo, Pretty in Pink, Basic Black, Tempting Turquoise, Daffodil Delight, Confetti White, Vellum Paper
Ink:Chocolate Chip, Markers-Melon Mambo, Pretty in Pink, Tempting Turquoise, Daffodil Delight 
Accessories: Framed Tulips Textured Impressions Embossing Folder, Perfect Polka Dots Textured Impressions Embossing Folder Die, Lots of Tags Die, Big Shot, Wide Oval Punch, Daffodil Delight 1/4" Grosgrain Ribbon, Basic Rhinestones, Hodge Podge Hardware Flower Ribbon Slide


Photobucket

Friday, October 29, 2010

Get Well

This was the first card that I was happy about in a very long time.  I think I had lost my creative mojo with all that has been going on.  I am still on some pretty strong pain meds while I am typing this post ( I made the card awhile back and had my son take the picture this morning) so if I make any errors I can blame them on that ;-).  As I sit here in my recliner looking across my bedroom at my work area (I cannot wait to get enough energy to get over there!) I see a pattern.  I have used the same color scheme in all of the cards that I have made the 2 weeks I had between my surgeries.  I love the Blueberry Crisp DSP and the colors that it comes in are great!

For the background on the Top Note Die I cut the paper in strips and glued them on a piece of scrap paper. I then ran it through the Big Shot and trimmed off the outer edge.  I then mounted it on the Crumb Cake and ran it through the Big Shot again with the Vintage Wallpaper Impression folder. I sponged Crumb cake across the top. The Pacific Point card base was stamped in Crumb Cake with the Sanded Background.  I sponged the edges of everything with Crumb Cake.  I am also addicted to the pearls and someone has to stop me from adding them to every card I make :).

Card Details:
Stamps: Aviary, Teeny Tiny Wishes, Sanded Background
Paper: Pacific Point, Crumb Cake, Blueberry Crisp DSP, Very Vanilla
Ink: Early Espresso, Pacific Point,
Accessories: Big Shot, Top Note Die, Corner Rounder Punch, Vintage Wallpaper Impression Folder, Victoria Crochet Trim Ribbon, Wide Oval Punch, Decorative Label Punch, Word Window Punch, Modern Label Punch, Basic Pearls


Photobucket

Friday, October 08, 2010

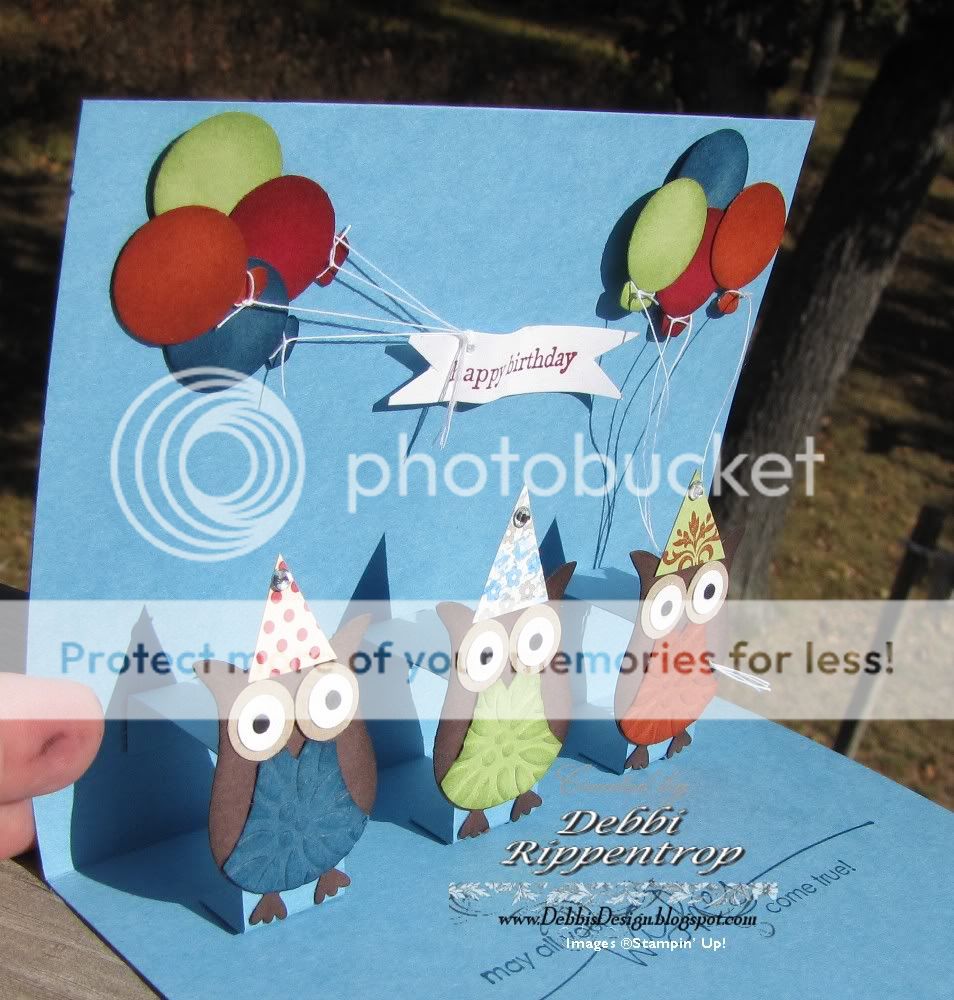
Balloon Owls


My daughter has a birthday party to go to tomorrow so I had to get a card made.  This one took me most of the week because my spare time is so sparse right now. When I saw this one on Splitcoast I know it was the one I wanted to do.  She asked if I could add a few balloons so that is just what I did ;)  I tore a piece of scratch paper and used my Whisper White Craft ink to create the clouds in the background.

The balloons are made with the 3/4" circle punch and a trimmed corner.  The hats I just free hand cut and she wanted some rhinestones added because all 9 yr old gilrs need lots of bling.

I chose not to cut the card but to just add legs for the pop up.  The hardest part was tying all of the thread to the balloons.


Stamps: Tiny Tags, Woodgrain Background, Heard from the Heart, Teeny Tiny Wishes
Paper: Marina Mist, Old Olive, Chocolate Chip, Crumb Cake, Cherry Cobbler, Not Quite Navy, Pear Pizazz, Cajun Craze, Whisper White, Basic Black
Ink: Early Espresso, Old Olive, Cherry Cobbler, Not Quite Navy, Lots of sponging with the matching colors
Accessories:  3/4" Circle Punch, Owl Punch, Bird Punch-Leaves, Wide Oval Punch, Jewelry Tag Punch


I am headed in for my first surgery on Monday so it may be a while before I can post again (unless I steal some time this weekend :)   )  Enjoy the beautiful fall weather and colors!

Photobucket

Wednesday, August 11, 2010

Lattice Birthday

Wow, this was one I did a while back and it must of been missed.  I loved the Lattice Impression folder when I first saw it, ok I love all of the Impression Folders.  Since it was on back order for soooo long I got to see many cards done with it with I was (not so) patiently waiting.  I saw quite a few that i liked when they impressed the whole card, even the image.  That is the look I was going for here.  I needed a card for a teen boy so I could not use flowers or pretty things :(  

Card Details:
Stamps: Perfect Punches, Birthday Bliss
Paper:Marina Mist, Early Espresso, So Saffron
Ink: Early Espresso
Accessories: Big Shot, Wide Oval Punch, Lattice Impression Folder, Large tag Punch, Small Tag Punch,  Lots of Tags Die

Photobucket

Wednesday, July 07, 2010

Envelope of Butterflies


Well, today was a hard one. This card went together soo slow.  I got up with the thought that I wanted to do the sketch challenge.  I just could not get things going. I just sat and stared at it.  I went to see if I could get some motivation from my colors and just stood there in front of my card stock rack and nothing....  So I grabbed my new color coach and just started spreading out the colors to see if something caught my eye, of course it was the Cherry Cobbler.  I might as well put loads of it on my order now so I never ever run out.  According to the Color Coach the colors under the Creative Combination were Cherry Cobbler, Daffodil Delight and Early Espresso.  So I grabbed a sheet of each and ran with it.  I laid them out and I must of rearranged them 15 times before I got them in an order I was happy to proceed with.  I had done a blog design a while back for someone where I had buttons being poured out of an envelope.  That is what I saw here after I sat and stared at my set, dies, and colors. So off I went to see if the vision in my head would look as good in paper and ink.

The first thing I made was my envelope.  I scored it and folded it so that it would fit through my scallop oval punch.  I folded the scored edges in and cut them from the flap area.  I then slid the whole thing through the punch until I had the flap just where I wanted it.  Next I sponged the Cherry Cobbler ink around all of the edges and ran it through the Big Shot with the Impression Folder.  I glued it together and moved on to figure out what size I wanted my circles to be.  I cut them out with my Scissor Plus, stamped and sponged.  In the beginning I had the ribbons going straight out but in the long run I wanted them flared just a bit.  I toyed with many variation with punches for the sentiment and found I liked this combination the best.  I just got the Tag Dies and I know I will get my money's worth out of them. All in all this card took me about 3 hours from start mail, which is extremely long for me. Well, off to sign it and put it in an envelope to mail yet today.  Thanks for stopping!

Card Details:
Stamps: En Francias Background, Teeny Tiny Wishes
Paper: Cherry Cobbler, Early Espresso, Daffodil Delight, Naturals Ivory
Ink: Cherry Cobbler, Early Espresso
Accessories: Big Shot, Wide Oval Punch, Scallop Oval Punch, Circle Scissor Plus, Vintage Wallpaper Impression Folder, Beautiful Wings Die, Lots of Tags Die, Piercing tool and Mat pack, Early Espresso Taffeta Ribbon


Photobucket

Friday, February 05, 2010

Punch Love

I love, love,love punches!  I made this card on Wednesday and toyed with whether or not I was going to post it.  As much as I love this bird punch it is on back order until March.  I guess it was a bigger hit than what the supplier thought and they just did not get Stampin' Up! what they ordered (from what I heard).  I have had the Hi Embosslit since the catalog came out and just have not found the card I wanted to use it on but I thought it fit this layout great.

The bird is double punched and offset.  I also sponged around the edges to give it a bit more dimension.  I cut the HI twice and then punched out the center with the 1" circle punch and layered the wide oval punch behind it.  Used torn paper edge to do the clouds in the bashful blue along the top.

Card Details:
Stamps: Season of Friendship
Paper: Chocolate Chip,Old Olive, Bashful Blue, Whisper White
Ink: Chocolate Chip, Old Olive, Bashful Blue-Sponged
Accessories:Punches: Scallop Trim Border, 1" Circle, Wide Oval, Medium Jewelry Tag, Extra Large Two Step Bird, Perfect Polka Dots Impression Folder, Big Shot, Old Olive Grosgrain Ribbon, Hi Embosslit Die
Signature

Tuesday, September 29, 2009

Purses


Well, after the Monday that I had I just had to dive into my stamps and create something pretty today. I had this layout stuck in my head all night but not at all sure what I wanted to do with it. This morning, after I made sure that breakfast had been consumed and school was started I straightened up my desk and went to find the color challenge of the day. Ohhh...Sage Shadow, Pretty in Pink and Going Grey. It was not until I was uploading my card that I noticed that I used Basic Grey instead...oh, well. The designer paper I used is in the Holiday Mini. I turned the paper pattern different directions on purpose. The purse die I used is from the Build a Bear dies. I wanted some texture so I grabbed a Embossing folder. I tend to use the popped up side of the folder image but since the paper pattern was busy I decided to use the popped inside. I liked the way it looks a lot more than I thought I would and will use it more often.

Stamps: Teeny Tiny Wishes
Paper: Basic Gray, Pretty in Pink, Sage Shadow, Whisper White, SU Night & Day Specialty Designer Paper
Ink: Pretty in Pink
Accessories: SU Beary Girl Sizzlits Die- Purse, 1-1/4" Square Punch, SU Finial Press Embossing Folder, Big Shot, Punches-Wide Oval, Scalloped Oval, Large Oval, Small Oval, Pretty in Pink Taffeta Ribbon

Signature

Monday, August 03, 2009

Egg Plant Butterflies


I have a workshop next week and thought this might be a good card for a make and take. One of my close friends loves purple and butterflies so I think she will like this card. I so wanted to try the butterfly punch to go with this Flight of the butterfly stamp set. I am loving this Modern Label Punch...but I love all the punches, don't I? I so am getting my money's worth out of my Teeny Tiny Wishes. It has soooo many sayings and they fit perfect in the smaller punches I like to use. As you can tell I am really getting into layering my punches for the salutations.


Stamps: Inspired by Nature, Teeny Tiny Wishes, Flight of the Butterfly
Paper: Eggplant Envy, Lavender Lace, Old Olive, Very Vanilla
Ink: Old Olive, Lavender Lace, Eggplant Envy
Accessories: Wide Oval Punch, Scalloped Edge Punch, Modern Label Punch, Word Window Punch, Butterfly Punch, Eggplant Envy Ric Rac from the Ribbon Originals-Orchard


Signature

Wednesday, July 22, 2009

Sketch Butterflies


Well I took today's Sketch challenge and turned it on it's side. I am so loving this butterfly Die for the Big Shot. These are not colors I would usually use. I had a teen girl over the other day to work on a 4Hproject for the fair. She requested the Regal Rose and the Taken Teal. I thought odd but when I suggested we add a base color and we decided that Chocolate Chip looked best I loved the combo and have used it a few times this last week. So you will be seeing more of this color combo and of course the Butterfly Die. I told the girl's mother that I would love a picture of her project, when she finishes it, to put on my blog. So far I think it is turning out wonderful and I hope she does well at the fair!

I just had to order all of the Textured Impressions Embossing Folders and the Texturz Plates when the new catalog came out. I used to be addicted to background stamps but now I have very few of them left and love the textured look!

Stamps: En Francias Background, Teeny Tiny Wishes
Paper: Chocolate Chip, Regal Rose, Taken with Teal, Whisper White
Ink: Chocolate Chip
Accessories: Big Shot, Elegant Bouquet Textured Impressions Folder, Finial Press Textured Impressions Folder, Wide Oval Punch, Scalloped Oval Punch, Modern Label Punch, Word Window Punch, Half Pearls from Pretties Kit, Beautiful Butterflies Die

Signature

Friday, July 17, 2009

Botty Birthday


This card was fun to make. If it wasn't for my unsteady coloring I would love it. I did not even realize that the double circle punch retired until I posted this card (boo hoo) I love it to make faux brads. It might be one I have to hold on to for a while...
Stamps: Lots of Bots
Paper: Riding Hood Red, Whisper White, Chocolate Chip, Old Olive, Print Patterns Paper
Ink: Riding Hood Red
Accessories: Wide Oval Punch, Photo Corner Punch, Large Star Punch, Word Window Punch, My Way Punch, Wide Double Stitched Chocolate Chip Grosgrain Ribbon, Double Circle Punch, Texturz Plate

Signature

Wednesday, July 01, 2009

Catalog Case


This is also a CASE from the catalog on page 139. I of course had to change it to make it fit what I have on hand (even retired paper...). I love the turn down corner look and the piercing.

Stamps: Teeny Tiny Wishes
Paper: Baja Breeze, Chocolate Chip, Whisper White, Regal Rose
Ink: Markers-Chocolate Chip, Regal Rose, Sponged-Baja Breeze
Accessories: Riding Hood Red 5/8" Striped Grosgrain Ribbon, Mat Pack, Piercing Tool, Spiral Punch, Wide Oval Punch, Scallop Oval Punch, Large Oval Punch, Eyelet Border Punch

Signature

Tuesday, March 24, 2009

Oval Silhouettes


This is another card from the stationary kit I made a few weeks ago. I tried to use the same colors and set through out. The background images are stamped off once.

Stamps: Pocket Silhouettes
Paper: Chocolate Chip, Old Olive, Old Olive Print Patterns, Whisper White
Ink: Old Olive
Accessories: Spiral Punch, Large Oval, Wide Oval, Wide Chocolate Grosgrain, Old Olive brads

Signature

Wednesday, November 05, 2008

Get Well Brock


This card is for the sketch challenge today. This will also be going to my brother who has surgery on Friday. Yes, it seems like my family has decided to invest highly in our medical. My brother had his leg shattered at work a few years back. Now he has an extra bone growing. So they will be removing the extra bone and the rod which has been giving him severe pain. He is also a diabetic so legs are a hard healer. I guess God wants to see us on our knees more!

Most of the card explains itself except the sentiment. I stamped the Get Well and punched with the wide oval. I then punched the large oval and cut in half to fit behind the wide one. Off to get the house ready. My folks are staying here since I live half way between my brother and sister.

Stamps: Winds of Grace, Sincere Salutation
Paper: Brocade Blue, Chocolate Chip, Very Vanilla, Prestwick DSP
Ink: Markers- Basic Black, Brocade Blue, Chocolate Chip, Chocolate Chip Classic Ink
Accessories: Big Shot, Top Note, Horizontal Slot Punch, Wide Oval Punch, Large Oval Punch, Basic Gray Taffeta Ribbon

Friday, October 31, 2008

Thanksgiving Turkey


Today's Limited Use Challenge was to disguise a stamp or use it for something other than it was intended. So I took my petal stamp and used it as feathers for my colorful turkey. Doesn't he look sad? I think next week I will have to challenge myself to stay away from the Earth Elements family and maybe go at least one layer without sponging....don't think I will make it. Well, this was a fun card to do and I am looking forward to sending it to the party I made it for. I have so many family members and can only be one place for Thanksgiving. Oh and I did manage to use Cameo Coral (pink) in one of the feathers!!

Have a Great Weekend!!

Stamps: Watercolor Vine Jumbo Wheel, Pick a Petal, Holiday & Wishes
Paper: Ruby Red, Pumpkin Pie, Chocolate Chip, Very Vanilla
Ink: Ruby Red, Pumpkin Pie, Close to Cocoa, Really Rust, Cameo Coral, More Mustard, Chocolate Chip, Basic black marker for the eyes
Accessories: Big Shot, Top Note, Wide Oval Punch, Small Oval Punch, Double Circle Punch, Photo Corner Punch, Horizontal Slot Punch, Designer Label Punch, Twine

Tuesday, October 07, 2008

Thanksgiving


Every year our church puts together Thanksgiving baskets for the elderly (our Senior Saints) and the shut ins that we minister to. I volunteer to make cards from the church for the baskets. I've learned not to rely on my health and I hate procrastination so I wanted to get to them right away. I decided this year not to make the cards the same but to make a variety of them. I kept them simple this year, as last year I did not and made over 70 of them. SO here are my 3" x 3"cards for this year.


Stamps: Pocket Silhouettes, Sanded Background, Bella's Border Wheel
Paper: Tangerine Tango, Chocolate Chip, Whisper White
Ink: Tangerine Tango, Chocolate Chip
Accessories: Scallop Square Punch,3/4" Square Punch


Stamps: Pocket Silhouettes
Paper: Not Quite Navy, Whisper White
Ink: Not Quite Navy
Accessories: Bashful Blue Grosgrain Ribbon


Stamps: Pockets Silhouettes
Paper: Old Olive, Chocolate Chip, Whisper White
Ink: Old Olive, Chocolate Chip
Accessories: Wide Oval Punch, Double Circle Punch


Stamps: Pocket Silhouettes, Holidays & Wishes
Paper: More Mustard, Chocolate Chip, Baja Breeze, Whisper White
Ink: More Mustard, Chocolate Chip, Baja Breeze
Accessories: Wide Oval Punch, Key Tag Punch

Related Posts with Thumbnails