Monday, October 31, 2011

Heritage Book MDS

This is the wedding picture of my grandparents. I so enjoy working on these books.  I love finding out where my past generations came from and what they had to sacrifice to come to America.

Photobucket

Friday, October 28, 2011

Lattice Quilt


I have seen faux quilt cards made with the new Embossing folder and the Lattice Die.  So today I just had to give it a try. It was so quick and easy and I think it is a great look.

Details:

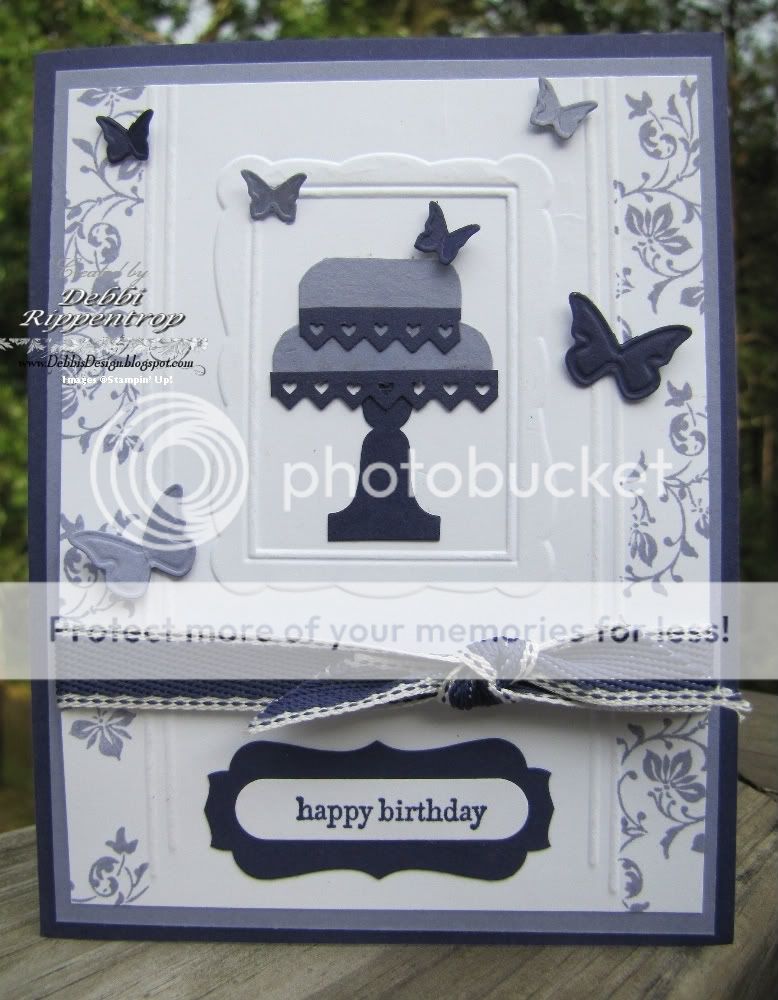
Stamps: Bring on the cake.
Paper: Crumb Cake, Cajun Craze, Well Worn DSP, Very Vanilla
Ink: Cajun Craze
Accessories: Big Shot, Word Window Punch, Modern Label Punch, Lattice Die, Lace Ribbon Border Punch


Photobucket

Wednesday, October 26, 2011

Happy Birthday

I am working on a bunch of card cases from the catalog.  This one came from page 66 in the current catalog. I did make a few changes to make it work for what I had.  Another very simple, easy, quick card.  I noticed that I have been using the Flower punch quite a bit lately.  It sure does add that small touch and is well worth it's money.

Card Details:
Stamps: Bring on the Cake
Paper: Whisper White, Pocketful of Posies DSP, Baja Breeze, More Mustard, Cherry Cobbler
Ink: Calypso Coral, Wisteria Wonder, Daffodil Delight, Bashful Blue, Certainly Celery, Pretty in Pink, VersaMark
Accessories: Flower- Itty Bitty Shapes Punch Pack, Basic Pearls, Big Shot, Square Lattice Impression Folder, Scallop Edge Border Punch, Cherry Cobbler Baker's Twine

Photobucket

Monday, October 24, 2011

Grandfather MDS

Here is another page out of my Mother's Heritage book.  Finally I got to a page where I had a picture that I could incorporate into the page.  This is my grandfather as a baby.  I am so thankful that my mother has so many wonderful pictures I can use.
Photobucket

Friday, October 21, 2011

Love a Wedding


I had a request for an elegant wedding card.  It had to be big enough so that a few families, that were going in together, could sign.  I have wanted to make the punch art wedding cake for awhile so this seemed like a perfect opportunity.  Since I had the extra room, the card is 5.5" x 8.5", I was able to add another element that I have wanted to do to the side.  I used the Round Tab Punch for the cake base.  I just punched it once and then put it back in to make it slimmer.  What a fun card to make,  I almost did not want to send it out. Lol  The inside was printed on Whisper White cardstock from the computer with a wedding poem.  I did not notice that my photo was blurred until after it was already gone.  I also alternated pink and white hearts across the bottom.

Card Details:
Stamps: None
Paper: Whisper White, Pink Pirouette
Ink: None
Accessories: Big Shot, Elegant Lines Impression Folder, Leaves-Bird Builder Punch, Flower- Itty Bitty Shapes Punch Pack, Beautiful Wings Die, Serif Essentials Alphabet Die, Punch Windows Die-Heart, Corner Rounder Punch, Scallop Trim Border Punch, Round Tab Punch, Basic Pearls


Photobucket

Wednesday, October 19, 2011

Birthday Balloon Catalog Case

So I have been working on some Cases from the catalog.  This card comes from page 163 in the catalog.  Since I was making this for a friend who is crazy about purple, especially the new Wisteria Wonder, I changed up the colors a bit. It was a very simple card to make and took me noting to through together in just a few minutes.


Details:

Stamps: Bring on the Cake, Patterned Party, Teeny Tiny Wishes
Paper: Lucky Limeade, Whisper White, Wisteria Wonder, Crumb Cake
Ink: Lucky Limeade, Whisper White, Wisteria Wonder, Cherry Cobbler, Elegant Eggplant, Early Espresso
Accessories: Big Shot, Stripes Impression Embossing Folder, Piercing Tool and Mat Pack, 2-1/2" Circle Punch, Concord Crush Stitched Poly Ribbon


Photobucket

Monday, October 17, 2011

MDS Monday Family Tree

As I mentioned in an earlier post I was working on my Mother's Heritage Book.  I decided to go another route for how to layout her family trees per page than I did with my Father's.  I did his with a spread sheet and thought that using the Forever Young digital  would be more appealing to the eye.  The tough part was that they had quite a few kids in the  family so it took a whole page to lay them out. I do my books in an 8.5" x 11" so this one I did in a landscape layout to help it fit better.  I started each page with the parents facing each other and then the kids below them all facing to the right.  I shadowed and offset the one that would continue the family tree on to the next page.  My mother had no problem following the layout.

Photobucket

Friday, October 14, 2011

Birthday Cake Wishes

I have been wanting to try the frame Impression folder as the focal point of the card without cutting it out.  So that is what I challenged myself with today.  I wanted more then that so I first did the outside lines with the Simply Scored Scoring tool and then lined up the frame in the center before running it through the Big Shot.  I masked the center of the card and stamped the flourish down the sides.  I had intended on putting candles on the cake but it did not look right so I thought butterflies would tie in with the flowers.  To do the Concord Crush part of the Sentiment I punched it, turned it around and punched it again, making it the size I needed.  I did the same thing with the punch to make the cake stand.
Details:
Stamps: Teeny Tiny Wishes, Vintage Vogue
Paper: Whisper White, Concord Crush, Wisteria Wonder
Ink: Wisteria Wonder, Concord Crush
Accessories:  Simply Scored Scoring Tool, Big Shot, Word Window Punch, Corner Rounder Punch, Decorative Label Punch,  Beautiful Wings Embosslit Die, Designer Frames Impression Folder, Pinking Hearts Border Punch, Round Tab Punch, Concord Crush 1/2" Stitched Poly Ribbon


Photobucket

Wednesday, October 12, 2011

Uncharted Sailboat

I peeked at the sketch challenge last night before falling asleep because I knew my time wold be limited today and I really wanted to use the new set I just got in.  So this had to be a simple quick card.  the reason I put off ordering this set was because of my coloring skills, or lack there of... As long as I was short on time I decided just no to color any of it in.  The biggest challenge for me in this sketch was the fancy something on the edge of the small strip.  Since this was a manly card I did not want any flourish.  I love my Tasteful Trim Die but I just forget to use it. I need to find a better place to keep my extended Dies!  I think it looks like waves sticking out of the edge....imagine very hard lol.  I had also just broke down and ordered some Seam Binding Ribbon just for the purpose of running it through the Big Shot and adding texture to it.  That is what helped me jump start my color theme for today.  For the rolled corner, I just rolled it down and stuck a glue dot underneath to hold it down.

Card Details:
Stamps: En Francais, Uncharted Territory
Paper: Not Quite Navy, Baja Breeze, Whisper White, Early Espresso
Ink: Not Quite Navy
Accessories: Big Shot, Houndstooth Impression Folder, Corner Rounder Punch, Baja Breeze Seam Binding Ribbon, Tasteful Trim Die

Photobucket

Monday, October 10, 2011

MDS Monday Faces 6


Wow, I just realized that I let this post without any comment from me at all.  What a busy week I have had!  I tend to be a very frugal person.  I love stamping and digi-scrapping but I hate to spend the money unless I earn it, so that is why I became a Demonstrator.  When I saw the price for the Downtown Grunge Digital I really debated on paying $19.95 for a download.  I let it sit for a bit and then I broke down and ordered it.  I love it.  It has so many uses and elements that I will use on many many pages.  So if you are debating on getting it or missed it on the downloads, I give it 2 thumbs up!


Photobucket

Friday, October 07, 2011

From The Heart

These are my most favorite colors!  I think the Well Worn DSP might be one of the only that I use up and will have to re-order before the catalog retires.  I am not a big DSP buyer but these colors hit my taste perfectly!  When I started this card I knew I wanted to do a few rows of hearts.  So I went to look through my DSP to see my color theme.  I figured that I did not want just a plain card front and I did not want to trim around the edge of the Top Not Die so I decided to try something new.   I cut an Early Espresso and then quartered it.  The hardest part was to layer it so all was even.  I tied on my ribbon and tags and it was all set to go in the mail.

Card Details:
Stamps: Heard From the Heart, Tiny Tags
Paper: Crumb Cake, Well Worn DSP, Early Espresso, Not Quite Navy, Cajun Craze, River Rock
Ink: Early Espresso, Not Quite Navy,
Accessories: Big Shot, Top Note Die, Small Heart Punch, Jewelry Punch, Chantilly Crochet Trim Ribbon, Early Espresso Baker's Twine

Photobucket

Wednesday, October 05, 2011

Miss You!


When I saw today's sketch the first thing I thought of doing was the Rhinestones down the center of the ribbon.  So the first thing I did was look at which ribbon I wanted to use.  Once I had chosen the Quilted Satin Ribbon from the Holiday Mini I checked to see which designer paper I had to go with it.  I know it says Early Espresso on the ribbon, but I found that mine matched the Chocolate Chip Cardstock better.  Thankfully both were in the Designer sheet that I chose.  One of the great things about the Designer paper in the catalog compared to what you buy in the store is you can look at the paper in the catalog and it will tell you what colors it matches with.  Behind the stamped bench, which is embossed, I used the clear block method.  I wanted something slight so I took my the clear block I had the stamp on and pressed it in the River Rock ink pad.  Then I stamped it on the paper, cut around it and rounded the corners.  I stamped the bench with Early Espresso and  used the stamp-a-ma-jig to stamp over it with Versamark so that I could emboss it.  Of course every edge was sponged with Chocolate Chip ink.  The flower centers are done with the small side of the crop-a-dile.   I do not have a small enough circle punch and it works perfect.  I keep an old CD that I put a dab of Mono-adhesive on and use a toothpick to apply glue to the smaller items.  I know the set I go the sentiment from is called Three Little Words and I had every intention of using the Three Little Words until I decided what punch I wanted to use and saw what fit. So it is Two Little Words instead...Lol

Card Details:
Stamps: Have a Seat, Three Little Words
Paper: River Rock, Chocolate Chip, Well Worn DSP
Ink: Versa Mark, Early Espresso, Chocolate Chip
Accessories: Clear Embossing Powder, Stamp-a-ma-jig, Corner Rounder, Basic Rhinestones, Early Espresso 3/8" Satin Ribbon, Decorative Label Punch, Small Oval Punch, Itty Bitty Shapes Punch Pack-Flower, Flower Center is from the Crop-a-dile-Small side

Photobucket

Monday, October 03, 2011

MDS Monday Faces 5


Another page from our first day of school photo shoot.  My favorite thing about digi scrapping is that you can make your pictures any size you wan them to be.  

Photobucket
Related Posts with Thumbnails