Wednesday, January 27, 2010

Butterfly Bookmark

I have been wanting to make one of these super sized bookmarks for a long time. I thought they would be a cute gift to hand out with thank you cards to teacher and so forth.  First I stamped a flourish and then ran the cardstock through the impression folder.  I adhered it to the chipboard with the Tombo Mono Multi glue.  After it had dried I ran them together through the Big Shot with the Beautiful Butterflies die. I punched a hole with my Crop-a-dile to put the rhinestone brad through.  Glued the back and front together with the jumbo paperclip in between.  I used E6000 glue to hold it all together.  They are great to add a heavy magnet on the back and use to hold notes on the refrigerator.  I sprayed them with Champagne Shimmer Spray to give them a sparkly shine. :)

Card Details:

Stamps: Baroque Motifs
Paper: Chip Board, Almost Amethyst
Ink: Lovely Lilac
Accessories: Finial Press Impression Folder, Big Shot, E6000, Jumbo Paperclip
Signature

Friday, January 22, 2010

Embossed Tree

This was a card that I designed a while back. The teen girls from our church put them all together. They handed them out with a handmade ornament to the elderly when we went caroling right before Christmas.  The trick to get the center flat is to make a template with the center cut out to go on the outside of the Impressions folder when you run it through the Big Shot.  I have heard of a few that have broke their Big shot by making the template too thick.  I made mine with thin Chipboard.  If it seems too tight do not put it through the machine.  I just kept trying mine until it went through tight but not hard.  We colored the Hollies in with markers.  The tree was stamped in Garden green and then we took the Chocolate Chip marker to do the trunk and a few branches. I am using the extras that I had cut for Thank You cards.  Have a great weekend!

Card Details:
Stamps: Lovely as a Tree
Paper: Very Vanilla, Ruby Red
Ink: Ruby Red, Chocolate Chip, Garden Green
Accessories:Chocolate Chip Taffeta Ribbon, Petals-a-Plenty Impression Folder, Big Shot


Signature

Wednesday, January 20, 2010

I Love...


Sorry that I did not get a MDS  post posted on Monday.  My schedule this week is just crazy.  I hope to be back to regular programing next week.  I made this card last week.  I got this set with my first SAB order and I just had to use it.  I colored the images with the markers and sponged across the top of the embossed card front.  I had fun playing with the corner punch and border punch!  I am also loving the new epoxy brads!

Card Details:
Stamps: Things I Love
Paper: Rich Razzleberry, Chocolate Chip, Whisper White
Ink: Rich Razzleberry, Chocolate Chip
Accessories: Chocolate Chip Grosgrain, Big Shot, Finial Press Impression Folder, Scallop Trim Corner Punch, Scallop Trim Border Punch, Ticket Corner Punch, 1-1/4" Square Punch, 1-3/8" Square Punch, Chocolate Chip 1/4" Sending Love Epoxy Brads

Signature

Friday, January 15, 2010

Robot Birthday


My son has to leave for a birthday party tonight so I had make a boys birthday card.  I love this set but just am not very good at coloring line stamps in.  So I took another avenue and did the Stamp emboss technique.  If you do not know how to do this technique let me know and I will try to put together a tutorial.  I have seen the other effect that I did on so many cards lately that I just had to give it a try and I love the way it turned out!  You just use your slit punch along the edge and fold it over.  I just put a lighter piece of cardstock behind it after I folder it over. I do not know if you can tell but I did use the Big Shot with the Harlequin plate for texture on the Big Bashful Blue background. Well, I better get this boy ready for his sleepover.  Wishing you all a great weekend!!

Card Details:
Stamps: Lots of Bots
Paper: Not Quite Navy, Bashful Blue
Ink: Not Quite Navy, Versa Mark
Accessories: Slit Punch, Silver Embossing powder, Circle Punches-3/4", 1", 1-1/4"
Signature

Tuesday, January 12, 2010

Felt Thank you


I actually had the time today to do one of the color challenges.  The colors were Chocolate Chip, Pretty in Pink and Rich Razzleberry.  I had those three colors sitting on my desk for hours this morning just walking past them while doing my chores trying to figure out how I wanted to use them.  I caught the Felt Sweet Pea kit sitting on my shelf out of the corner of my eye and it all just fell together.  I ran the sponge over the high points of the embossed spots to give more dimension.  I also sponged around the edges.  I did add the old Olive leaves so I hope I was not breaking and challenge rule, but they just needed that extra to be complete.  I tore one of the min glue dots in thirds to mount the mini butterflies.

Card Details
Stamps: En Francais, Teeny Tiny Wishes
Paper: Chocolate Chip, Pretty in Pink, Rich Razzleberry
Ink: Rich Razzleberry
Accessories: Stitched Felt Sweet Pea, Embosslits Beautiful Wings, Medium Jewelry Tag, Mini Glue Dots, Final Press Embossing Folder

Signature

Monday, January 11, 2010

MDS Monday- Blog Button Tutorial

I had a comment the other day that asked if I would do a tutorial on how to do the cute buttons I have preceding my categories in my sidebar.

I have been wanting to play with the Sweet Peas kit since it came out last week so this will give me a great chance to work with it here.

As you can see I build all my elements for each blog right on the same page.  This is the one I was playing with today. I have added a square punch and sized it on the MDS scale to 1.75" x .75". 


Next I am going to want to add a little color to my button.  You can always leave it Whisper White.  My background is Whisper White and I wanted mine to look like it had no background so I just left it as so.  I do leave the Mat around the outside until I crop it, that way I know that I stayed within my work area. So here I am going to add some of the designer paper.


I am going to use the one that has the little birdies all across the top.

but as you can see when when I choose OK all I get to see is the bird legs...so I am going to double click on the punch.


 and this little box is going to pop up so that I can drag the paper around until I get the image within the box where I want it.

So I have this little bird right on the edge of my button.

I have gone ahead and added a flower and some text to the image in MDS.  If I have quite a few of these to do, what I do is save it without the text and add the text in my photo editing program after I have cropped it.  That way I can change the text over and over and save each one without having to create so many buttons.


So now I am going to click Share Project/Export to JPG.  I always choose to export at 100%


After it is all saved, I go ahead and open it in my Photo editing program.  I use Microsoft Picture It 10! but there are others out there.  If you need help finding one click contact me in the navigation bar above and send me an e-mail.  I found one free on-line that I can point you to if you are interested.


I have noticed that some are having trouble keeping the images at the same size when the bring them in to crop them.  As you can see the image prior to this one came in quite a bit larger than the original 8.5" x 11".  So I have started by creating a new blank canvas in the size I want my finished project to be.


 I cropped the button and then drug and dropped it unto the blank canvas I created in the size I wanted.


I have headed on over to blogger and went to my elements page.  You are going to want to click Add a Gadget


and choose picture.


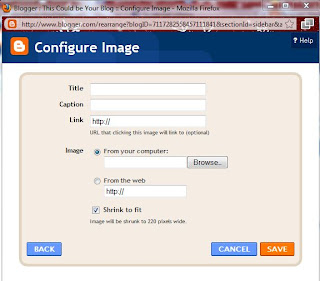
This window is going to pop up.  Do you see at the bottom where is says "Shrink to fit"?  Make sure that you un-check that.  Go to browse and find where you have saved it on your computer.  It will take a short time to upload.


Once your image appears you can go ahead and click Save.

Your element will automatically go to the top of you list.  Just drag each one to the position that you want it at.  Just remember to hit the save at the top of the page before you view it.


So here is the About Me button that I have created for this blog.  If you have any questions, comments, or requests please post them in the comment section below.

Happy Blogging!


Signature

Friday, January 08, 2010

Butterfly Note


I got a new light box and camera for Christmas and figured out neither of them were my problem with getting good pictures....the problem is the photographer.  Well I am on the subject of photography check out out Home Educator Group's photography contest blog. I won't tell you which ones belong to my son until after the voting is closed. I want to keep it fair for all of the kids.  Since you will not know the votes until after you vote I can share that my son is ahead in 2 of the categories.  Maybe I should have him take my card pictures for me. :)

This is a card that is in the new Ocaasions Mini catalog.  I have been wanting to CASE (copy and steal everything) since I saw it.  I had very little time today but just wanted to get back in the swing so I thought today would be a good day to do this very simple card.  They did use textured cardstock in their example but since I do not have it in that color I decided to go ahead and use the Sanded background, and of course sponge around the outside.  I also do not yet have the Tiny Tags set (it will arrive on Wednesday with my SAB order) so I used the marker to say Hello off of the Hello Baby stamp in the Teeny Tiny Wishes set.  I am love, love, loving the new style punches and the new Beautiful Wings embosslit.  The butterflies are held on by roled up mini glue dots.  I was afraid that the flat gule dots would not let them stay "in flight" mode.  Have a great weekend and I hope to see you all on Monday!

Stamps: Sanded Background, Teeny Tiny Wishes
Paper: Soft Suede, Old Olive, Crushed Curry, Rich Razzleberry, Bermuda Bay, Very Vanilla
Ink: Soft Suede
Accessories: Big Shot, SU Embosslits Beautiful Wings, Medium Jewlery Tag, Sewing Thread


Signature

Wednesday, January 06, 2010

Love you (New toys!)

 
Wow, I just have not had the time to stamp.  My son had to be back to college early because of work so he flew out on Monday.  Then life got back to normal.  Well normal for everyone else, I get to play catch up on all of the things that did not get done while we were on break.

Today I decided I was going to play with some new toys and do the Sketch Challenge.  I was not so sure about the colors I choose until the card evolved a little more.

I HAD to use some of the new clear mount stamps.  The problem is I just ordered the blocks yesterday so I had to be inventive and mount them on something else to be able to use them.  I found they stick quite well one of the clear DVDs that come on the top of a pack of DVDs. :)  I am sure they will be much easier to use on the clear blocks, but I was just itching to use them!  I did lots of sponging around the heart and each top frame.

Card Details:

Stamps: Vintage Vogue, Well Scripted
Paper: Basic Gray, Chocolate Chip, Pretty in Pink, Rose Red, Whisper White
Ink: Whisper White Craft, Pretty in Pink, Rose Red, Basic Gray
Accessories: Big Shot, SU Embosslits Scalloped Heart of Hearts,Stitched Felt Sweet Peas,Chocolate Chip Wide Grosgrain, Finial Press Impression Folder, Perfect Polka Dots Impression Folder, Chocolate Chip 5/8" Jumbo Brad
Signature
Related Posts with Thumbnails