Showing posts with label Small Oval Punch. Show all posts

Tuesday, March 01, 2011

Oval Birthday

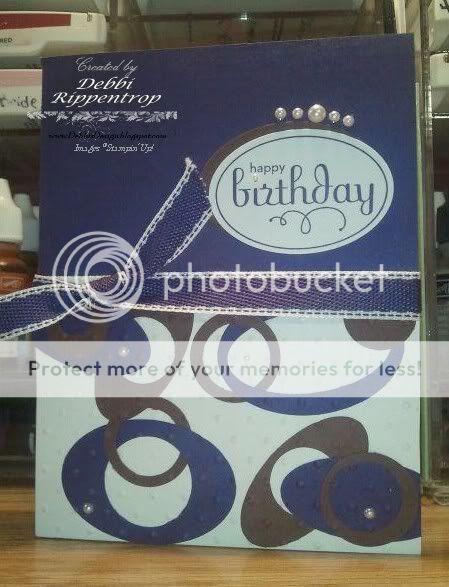
Once again I saw this concept on another blog but I did not bookmark it so I cannot point you back to it.  If it is yours or if you know where it came from please let me know so that I may edit and give proper credit.  I do believe the original card is pink and brown.  I punched out various ovals and circles and adhered them to the card.  I then ran the whole base through the Big Shot with the Perfect Polka Dots Folder.

Card Details:
Stamps: Perfect Punches
Paper: Concord Crush, Chocolate Chip, Whisper White
Ink: Concord Crush
Accessories: Big Shot, Perfect Polka Dots Impressions Folder, Wide Oval Punch, Small Oval Punch, 3/4" Circle Punch, 1" Circle Punch, Mini Circle Punch, Pearls, Concord Crush Stitched Poly Ribbon


Photobucket

Wednesday, November 03, 2010

Favorite Mushrooms

This was a set that was at the top of my want list when the catalog came out.  I thought these little mushrooms were the cutest.  I stamped them twice, once in Soft Suede and once in Pacific Point.  I then cut out some of the elements in Soft Suede and mounted them on top on the Pacific Point ones.  The pearls between the mushrooms...were meant to be.  (I smudged a finger print and had to cover it up....)  If you can see I added a few pearls inside the background impression too.  The sentiment design just came together too.   I love the way it turned out so fun!  This poor image was stamped and matted weeks ago and tried on various cards and I just could not get it to fit, so it just went back on the shelf to wait...until I finally came up with a home I think it is very happy on.

Card Details:
Stamps: Funky Four, Teeny Tiny Wishes
Paper: Pacific Point, Soft Suede, Very Vanilla
Ink: Soft Suede, Pacific Point
Accessories:  Big Shot, Elegant Lines Impression Folder, Pearls, Victoria Crochet Trim Ribbon, Dotted Scallop Ribbon Border Punch, Small Oval Punch, Large Oval Punch, 3/4" Circle Punch


Photobucket

Friday, February 26, 2010

Winter Window

This card was lost in the shuffle of the holidays.  I was going through my card picture file and found this card I had made for my Dad for his birthday.  The tree and the bird were stamped on a Whisper White card stock,  I stamped the snowflakes on a window sheet.  Boy did I have fun cutting the trim for my window.  I wanted to make sure everything lined up perfect.  If I remember right it only took me two times to get it right.
Card Details:
Stamps: Season of Friendship
Paper: Chocolate Chip,Whisper White Craft ink
Ink: Chocolate Chip, Ruby Red, Bashful Blue-Sponged
Accessories:Small Oval Punch, Large Oval Punch, Circle Punch (for moon), ribbon
Signature

Friday, November 13, 2009

Photography Thank You


I asked a gentleman I know if he could come in to our Home-School classes (we meet once a month for special group classes) and talk to our teens about photography. I was hoping I would learn something too :). So then I got the opportunity to make a Thank You card for him from the group and here is what I came up with. I was debating between anything with the filmstrip and the punch cameras so I decided to merge them both and put the punch camera in the filmstrip. I needed to add the stars so it looks like the flashes were going off. I sponged around the whole front of the card and around each of the white boxes on the filmstrip. I used the crop-a-dile to punch the hole in the center of the smaller circle. This was a fun card to make and I know he will enjoy it!
Stamps: Medallion Background, Teeny Tiny Wishes, Define Your Life,
Paper: Basic Gray, Basic Black, Whisper White, Crushed Curry
Ink: Basic Gray,
Accessories: Punches- Spiral, Large Oval, Small Oval, Designer Label, 1" Circle, 3/4" Circle, Crop-a-Dial, Horizontal Slot, My Way, Small Star

Signature

Monday, October 26, 2009

Baby Carriage


One day I was surfing blogs and I ran across the most adorable baby carriage on Lyssa Zwolanek's blog. It was too cute not to case and simple too. She a great tutorial on her blog on how to do it. Sorry, my picture is not very good. The sun refuses to shine and I need to get a better light in my office for pictures because winter is on it's way hard and fast.
Stamps: None
Paper: Bashful Blue, Bashful Blue Designer paper, Basic Gray, Whisper White
Ink: None
Accessories: Large Oval Punch, Small Oval Punch, Eyelet Border Punch, Bashful Blue Taffeta Ribbon, Big Shot, Scallop Circle Die, Circle Punches for wheels

Signature

Tuesday, September 29, 2009

Purses


Well, after the Monday that I had I just had to dive into my stamps and create something pretty today. I had this layout stuck in my head all night but not at all sure what I wanted to do with it. This morning, after I made sure that breakfast had been consumed and school was started I straightened up my desk and went to find the color challenge of the day. Ohhh...Sage Shadow, Pretty in Pink and Going Grey. It was not until I was uploading my card that I noticed that I used Basic Grey instead...oh, well. The designer paper I used is in the Holiday Mini. I turned the paper pattern different directions on purpose. The purse die I used is from the Build a Bear dies. I wanted some texture so I grabbed a Embossing folder. I tend to use the popped up side of the folder image but since the paper pattern was busy I decided to use the popped inside. I liked the way it looks a lot more than I thought I would and will use it more often.

Stamps: Teeny Tiny Wishes
Paper: Basic Gray, Pretty in Pink, Sage Shadow, Whisper White, SU Night & Day Specialty Designer Paper
Ink: Pretty in Pink
Accessories: SU Beary Girl Sizzlits Die- Purse, 1-1/4" Square Punch, SU Finial Press Embossing Folder, Big Shot, Punches-Wide Oval, Scalloped Oval, Large Oval, Small Oval, Pretty in Pink Taffeta Ribbon

Signature

Friday, August 28, 2009

Red Medallion


So here is another card made with the Medallion. I saw one similar to this in the SCS gallery and thought what a great simple card. So I decided to case this card with my own little challenge. If you are a regular to my blog you can tell I seem to live in the earth elements family. So my challenge to myself was to use a color in the Bold Bright family. When I figured out the card I was going to make and my personal challenge I went through my Rhinestone brads to see what color I had to fit the challenge and red won. Since I was also in the need of a birthday card for a friend I decided to use black as an accent color. I have not yet used my curly Label punch so that was one thing that drew me to this card.

Stamps: Medallion Background, Teeny Tiny Wishes
Paper: Real Red, Basic Black, Whisper White
Ink: Real Red, Basic Black
Accessories: Red Gingham Ribbon, Red Circle Fire Rhinestone Brad, Filagree Designer Brad, Small Oval Punch, Large Oval Punch, Curly Label Punch

Signature

Friday, July 24, 2009

Butterflies


I missed a friend's birthday so I wanted to make her a very special card. Since I had just purchased the butterfly die and the Inspired by Nature Set I just had to use them. I have definitely gotten my money's worth out of by big shot. Stampin' Up had perfect timing with that. Since my hands are not are not as steady as I would like them to be I do so much more with dies and so I am still able to create cards. I bought a new pocket camera, since I have to have a camera with me and it is not always possible to carry my big one. Well, I guess I need to monkey with it's use since this turned out so drab....it is so much brighter and crisper IRL.

Stamps: Inspired by Nature, En Francias Background, Short & Sweet
Paper: Rose Red, Pretty in Pink, Whisper White (not sure the DSP name)
Ink: Old Olive, Rose Red
Accessories: Big Shot, Butterflies Die, Top Note Die, Large Oval, Small Oval

Signature

Tuesday, June 23, 2009

Summer Tango


Today I actually took the time to do a Color Challenge. Of course I had to use one of my sets from the new catalog. I did the sun by punching out a 1" circle from scratch paper and using the hole to sponge in some color. I sponged the Pacific Point just around the sides and top of the image sheet. I did sponge around the whole card base with the Tangerine Tango I stamped the pheasant first and then masked it to put the wheat in the background. I so wanted to use the buttons since those colors will retire next week and I once again was hoarding them...


Stamps: Sanded Background, Autumn Days, Teeny Tiny Wishes
Paper: Summer Sun, Pacific Point, Tangerine Tango, Chocolate Chip, Very Vanilla
Ink: Tangerine Tango, Summer Sun, Pacific Point, Chocolate Chip
Accessories: Corduroy Buttons-Pacific Point, Summer Sun, Pumpkin Pie, 3/4" Circle Punch, 1" Circle Punch, Small Oval Punch, Large Oval Punch


Signature

Monday, May 18, 2009

Happy Elmo


This was made for one of my 16 year old nieces (I have 3). She is an Elmo fanatic. I did case the idea of the card, it was just too fun to make and I know she will love it.

Card Details:
Stamps: A Little Birthday Cheer
Paper: Real Red, Whisper White, Chocolate Chip, Old Olive, Basic Black, Only Orange, Tangerine Tango, Yoyo Yellow, Pretty in Pink (Big Birds tongue) Brilliant Blue
Ink: Tangerine Tango
Accessories: Tangerine Tango Striped Grosgrain Ribbon, Scallop Circle Punch, lots of circle punches-sorry I cannot remember off hand which ones I used, Horizontal Slot Punch, Small Oval Punch, Large Oval Punch, Scallop Oval Punch

Signature

Friday, February 20, 2009

Train for Dylan


We have a birthday party this weekend. The little boy loves trains. I thought this set would be a hit with him. I embossed the train with Whisper White embossing powder on Basic Black paper. The orange I ran through the Big Shot to add the dots. I even went out and used the Bold Brights. I hardly use that color family, but I wanted this card to be bright and colorful.
Stamps: Happiness is a Journey, Short & Sweet
Paper: Brilliant Blue, Really Red, Only Orange, Basic Black
Ink: Whisper White Craft Ink, Brilliant Blue
Accessories: Large and Small Oval Punch, Whisper White Embossing Powder, Big Shot, Texturz Plates, Ticket Corner Punch, 1/2" Real Red Striped Grosgrain Ribbon, Jumbo Eyelets

Signature

Wednesday, February 11, 2009

Baja Blues


Well, I made this card a few days ago but got so busy I forgot to upload it. I was going to drop it in the mail and almost realized it too late. Of course I had to use the Texturz plates! This card was so simple to do. I think I may use this for a make n take in a few weeks...
Stamps: Pocket Silhouettes
Paper: Baja Breeze, Not Quite Navy
Ink: Baja Breeze, Not Quite Navy
Accessories: Large and Small Oval Punch, Double Stitch Baja Breeze Grosgrain Ribbon, Button Bouquet Button, Big Shot, Texturz Plates


Signature

Friday, October 31, 2008

Thanksgiving Turkey


Today's Limited Use Challenge was to disguise a stamp or use it for something other than it was intended. So I took my petal stamp and used it as feathers for my colorful turkey. Doesn't he look sad? I think next week I will have to challenge myself to stay away from the Earth Elements family and maybe go at least one layer without sponging....don't think I will make it. Well, this was a fun card to do and I am looking forward to sending it to the party I made it for. I have so many family members and can only be one place for Thanksgiving. Oh and I did manage to use Cameo Coral (pink) in one of the feathers!!

Have a Great Weekend!!

Stamps: Watercolor Vine Jumbo Wheel, Pick a Petal, Holiday & Wishes
Paper: Ruby Red, Pumpkin Pie, Chocolate Chip, Very Vanilla
Ink: Ruby Red, Pumpkin Pie, Close to Cocoa, Really Rust, Cameo Coral, More Mustard, Chocolate Chip, Basic black marker for the eyes
Accessories: Big Shot, Top Note, Wide Oval Punch, Small Oval Punch, Double Circle Punch, Photo Corner Punch, Horizontal Slot Punch, Designer Label Punch, Twine

Tuesday, October 28, 2008

Easy Boys Cards

I had a friend from church contact me about having her 3 boys (ages 6, 11 & 13) come over to make Thank you cards. I designed 3 very simple ones that they would be making by themselves. So these are the ones I came up with. I tried to keep it to 2 colors with a neutral, one stamp set each and one ink pad each. She wanted to keep the cost to a minimal so I left out the embellishments. My little kids always try to do the "wow" cards and get carried away. I wish sometimes they would take a step back to just do the simple.

edited to add: I was not happy with the first one so I took a redo and used the photo corner punch.
Stamps: Prehistoric Pals, Spot On Jumbo Wheel, Short and Sweet
Paper: Tempting Turquoise, Taken with Teal, Whisper White
Ink: Taken with Teal
Accessories: Large Oval Punch, Small Oval Punch


Stamps: Bronc Buster, Four Square
Paper: Handsome Hunter, Sage Shadow, Very Vanilla
Ink: Handsome Hunter
Accessories: Scallop Square Punch


Stamps: Winds of Grace, Think Happy Thoughts
Paper: Pacific Point, Baja Breeze, Whisper White
Ink: Baja Breeze
Accessories: 1 1/4" Circle Punch, 1 3/8" Circle Punch


Thursday, October 16, 2008

Plaid Shirt


Today's Ways to Use it Challenge was to use Plaid on your card. I had lots of chores to get finished today. My favorite (and only) husband of 23 yrs is going in for surgery tomorrow. He has to have 2 muscles and a bone repaired in his rotator cuff. So I needed to get the house and kids in perfect order before I was allowed to create today. This is a super easy card!

I cut the card front to 4 x 5.25. I then cut the top part way down at the 2" mark and folded down the collars. I cut the pocket and folded down the top and cut a 1/2" strip to put the buttons on. I sponged the edges of the collar, button area, and pocket. I did put a v in the top of the button strip so it would fit tight. I used the mat pack to pierce for the buttons which are the clear rhinestone brads from the pretties kit.

I decided to still put a small sentiment on the front of the card so I kept it simple, and yes I sponged around the plaid on that. ;)

Stamps: Short & Sweet
Paper: Prestwick Designer Paper, Night of Navy
Ink: Night of Navy- Craft
Accessories: Pretties Kit Clear Rhinestone Brads, Large Oval Punch, Small Oval Punch


Tuesday, October 14, 2008

Dear Friend


Boy, how things work out! When I went to bed last night I thought about making a pink card. I had no stamp sets or ideas in mind, I was just in a pink mood. So when I saw the color challenge this morning I about fainted. It was to use Pink Pirouette, Basic Black and White. I wanted something soft and pretty. My daughter has a birthday party for one of her best friends this weekend so I wanted a card for her. This little girl reminds me so much of Shelby and Hannah, when they actually do stand still that is....


I wanted a deep black image on the Pink Pirouette ribbon and the black ink just was not black enough. So I wheeled the image on the ribbon with versamark ink and embossed with Black Embossing powder. Since we do not have Craft ink in the In Colors I stamped with the Pink Pirouette and then used the Stamp-a-ma-jig to stamp over it with the Versamark so I could emboss with clear embossing powder. I then sponged around the edge of the image. This set is not in the catalog but is on the dormant list so it is still able to be ordered.


This was an idea I had that is funny now but was not at all fun...I wanted to use my Rub-ons since I tend to hoard them, but know I have to use them. I put the image on the cardstock and found the punch I wanted to use. I punched the section out and the punched section slid right into the head of the punch. Can you believe that???? This really steamed me since there is only one of those in that color on the sheet! So I shook and tapped and prayed and nothing. My son came in to ask me to check his Bible test and I told him what happened. I shook it to let him hear it was in there and squeezed the trigger and it flew out. So I was able to finish the card. I sponged a bit of black around the edge of the oval pink. Ipopped up the sentiment with a pop up glue dot.

Stamps: Bella's Border Wheel, Summer by the Sea
Paper: Pink Pirouette, Basic Black, Whisper White
Ink: VersaMark, Pink Pirouette
Accessories: Pink Pirouette 1 1/4" Grosgrain Ribbon, Black Embossing Powder. Crystal Clear Embossing Powder, Stamp-a-ma-jig, Large Oval, Small Oval, Chateau Bella Rub-Ons

Thursday, October 02, 2008

Long Sihouettes


Well, here is the second card for my October stamp night. I ordered these envelopes by accident so I planned on purposely designing a card that could go with the long Kraft envelopes. So I get an idea and get to work. I finish the card and go to put it in my project box (I set aside one for each project planned), only then do I remember that the envelope is not the same size as the regular invitation envelopes...So I begin again and measured the envelope first! This is the same concept, I just had to put the elements on top of the ribbon instead of above it. I sponged Always Artichoke around the edge of the card front. The image rectangles are 1" x 2" before matting.

Stamps: Stitched Background, Pocket Silhouettes
Paper: Chocolate Chip, Always Artichoke, Very Vanilla, Kraft
Ink: Chocolate Chip, Always Artichoke
Accessories: Small Oval Punch, Word Window Punch, Chocolate Chip Double Stitched Ribbon, Kraft Small Open Ended Envelopes


Monday, September 29, 2008

Fall Sky


Well, busy-ness worked to my advantage today! I had planned on getting up and making this card for someone for their birthday this week. This is one of their favorite sets and the trees outside are looking wonderful so I had this all planned. So something came up this morning that pushed my stamp time back until after lunch which was perfect because in that time UPS came with my Top Note Die for my Big Shot. I think it made this card so much easier. I used my brayer for the sky and grass. I did a lot of sponging to get more colors where I wanted. I also used the aqua pens (on sale starting Wednesday) to accent the grass line under the trees. Off to unpack my new toys and start planning my Christmas Cards....

Stamps: Lovely As a Tree, Short & Sweet, So Swirly Jumbo Wheel
Paper: Chocolate Chip, Tangerine Tango, Whisper White, Kiwi Kiss
Ink: So Saffron, Chocolate Chip, Tangerine Tango, Kiwi Kiss, Riding Hood Red
Accessories: Big Shot, Top Note Die, Small Oval, Large Oval, Brayer


Tuesday, September 16, 2008

Antique Train


Wow, two days in a row I have had time to stamp! This one is for my nephew who turned 14 last weekend. So it won't be too late...

Today's goal was to do a fairly simple card. I was going to do the split image but after I embossed the train I wanted to keep it all black. The Happy Birthday is also embossed. The photo corner punch is popped up with a glue dot. I sponged around the outside with Basic gray because I did not want it as bold as black.

For those of you who have been asking about my heath: Things are improving. They have changed my daily meds again as the last stuff made my blood pressure raise too high. I have only been on this current stuff for just about a week now and I am still adjusting. She said to give it 2-3 weeks to get into my system. I still am getting migraines every night but at least it is not every day all day. So I schedule my busy times in the day time. I periodically loose the use of my left arm (such as today) and it bugs me as it really limits how fast I can get things done or what I can do. I appreciate all the well wishes cards and prayers! God is in control!

Stamps: Happiness is a Journey, Sanded Background, Mark the Date
Paper: Basic Black, Whisper White
Ink: Craft-Basic Black, Whisper White; Classic-Basic Gray
Accessories: Photo Corner Punch, Small Oval, Large Oval, Black Brads, Winter White Embossing Powder, Basic Black Embossing Powder, Black Twine

Monday, September 15, 2008

Print Pattern Floral


So I guess one of the reasons I am drawn to this set is that I am not a floral person. This is a floral like set without being flowery, if you see what I mean. I am also thinking (trying to do that more:) ) that one of the reasons I seem so stamping stumped lately is that I have too many new things and want to use them all. That would make one big card! So this morning I decided to close my eyes and grab a set. I tried limiting myself to a few things and still went beyond that. Oh, well....I was not going to use the big shot and no more than two punches. I guess I am just not a person who can be limited.

The flowers in the back ground are just plain stamped, but the center flower is embossed. Since we do not have the In Colors in craft ink I just stamped with the classic and then used the Stamp-a-ma-jig to stamp over it with Versamark. I then embossed with Clear embossing powder. I sponged around quite a few of the edges.

Stamps: Pocket Silhouettes, Mark the Date
Paper: Riding Hood Red , Print Pattern DSP, Chocolate Chip, Pink Pirouette
Ink: Pink Pirouette, Riding Hood Red, Chocolate Chip
Accessories: 1" Dbl Stitched Grosgrain Ribbon, Filigree Brads, Punches- Small Oval, Large Oval, Wide Oval, Big Shot-Circles Scallops #2


Related Posts with Thumbnails