Monday, October 15, 2007

Pointsetta


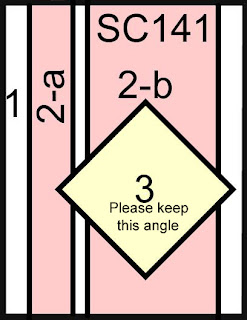
I've seen this layout so much lately I just had to use it. It is a simple yet out of the ordinary layout. I'll give you a sneak peak at next month's SU special. It will have to do with buying designer paper and getting some free. So today I am using some of my designer paper. The hardest part is deciding which side to use. I tried to keep it simple today as it is Monday and I have 5 kids asking me a million questions about school. The half circle was made with the Coluzzle. The pierced edges are suppose to resemble the pattern in the paper. I probably should of just left it pierced...I put a mini glue dot in the center of the flower and dumped some Dazzling Diamonds on it. I stamped the image and colored in in very diluted ink and aqua pens. I love the Rose Red DSP with the Purely Pomegranate
Stamps: Doodle This
Paper: Rose Red Prints DSP, Purely Pomegranate
Ink: Purely Pomegranate, Wild Wasabi
Accessories: Tool Kit for Piercing, Coluzzle Circle, White Gel Pen, Purely Pomegranate Double Stitched Ribbon, Mini Glue Dot, Dazzling Diamonds


Friday, October 12, 2007

Ornament


A few weeks ago our demo magazine, Stampin' Success came in the mail. They showed us how to make these cute ornaments with the scallop punch. I decided I wanted to make them with the center punched out. I decided I wanted a star in the center. I embossed first, punched the star and then the scallop. I lined them up, adhered one side and folded to line up the next. I only put adhesive on one half of one side. I did this until all 5 were attached. I attached the elastic cord with CE and held pressed until stuck. I did not want to waste the stars I had punched out so I took 3 of them and added another cord to the bottom and hung it from there.
These are so fun, You have to give them a try!! They are very easy!

Stamps: Baroque Motifs
Paper: Basic Black
Ink: Versamark
Accessories: Gold Embossing Powder, Gold elastic cord, Star punch, Scallop Punch


Thursday, October 11, 2007

Blingaliscious


So today's challenge on SCS was the Ways to Use it Challenge. The challenge was to make it sparkle with as much glitz and glam that you could. This card is in memory of my favorite Bling travel mug that was broke when I fell down the stairs on Monday... The background is done on Glossy cardstock. The Dazzling Diamond Dust background is hard to photograph. I stamped the images I wanted, covered the whole sheet with versamark and Iridescent Ice Embossing Powder and then heated. The scalloped edges were done with the corner rounder and then ran through the crimper.


I added the photo corner punch at the last minute. I thought that corner was missing something. I decided it needed to be crimped also since the rest of the card had dimension, flat just would not do. I just had to add one more piece of bling.
SmileyCentral.comSmileyCentral.comSmileyCentral.comSmileyCentral.comSmileyCentral.comSmileyCentral.comSmileyCentral.comSmileyCentral.comSmileyCentral.comSmileyCentral.comSmileyCentral.comSmileyCentral.comSmileyCentral.comSmileyCentral.comSmileyCentral.com

Stamps: Baroque Motifs
Paper: Eggplant Envy, Mellow Moss, White Glossy
Ink: Eggplant Envy, Mellow Moss, Versamark, Eggplant Craft on cherish
Accessories: Corner Rounder, Crimper, Eggplant Envy Grosgrain, Scallop Punch, Photo Corner Punch, Tool kit for Piercing, Iridescent Ice Embossing Powder


Wednesday, October 10, 2007

Bronc Wheel


Today's Sketch Challenge was another great one! This card is nothing near what I had intended. I had planned on making a card today with lot of cutting, layers and embellishments. I had started cutting and thought "Oh, I want to try this with embossed resist" Well, that changed the whole card. Once I had finished the main image I wanted it more simple. I embossed the image with versamark and clear embossing powder. I then stamped the Sanded Background over it and wiped off the image. I sponged some Chocolate Chip ink around the edges.
Stamps: Bronc Buster, Bronco Wheel, Sanded Background
Paper: Creamy Carmel, Chocolate Chip
Ink: Creamy Carmel, Chocolate Chip, Versamark
Accessories: Tool Kit for Piercing, Vintage Brads,


Tuesday, October 09, 2007

School Thank you


So after making so many cards for our Home school group I am in a school mood. So when I saw today's color challenge (River Rock, Basic Black, Basic Gray) all I could think of was to do a school card. I will probably end up mounting this on a bigger card later and using for the home-school group. I had to keep it simple today as I took a fall down the stairs yesterday and I am pretty banged up and sore. So I am back to bed after posting this! The kids know school comes to me today. The round tab punch was punched, edged with basic gray and then stamped. I then punched just the edge on black and adhered on the top of the River Rock.

Stamps: Sanded Background, Elementary Essentials, Short and Sweet
Paper: Basic Black, Basic Gray, River Rock
Ink: Basic Black, Basic Gray
Accessories: Black Eyelet, Crop-a-dile, Basic Gray Taffeta, Round Tab Punch

Monday, October 08, 2007

Big Thank you


Well, I needed another thank you card for our Home school group. We took a trip to see the fire station and Ambulance station. This one was made for the Ambulance ladies who gave us a great tour! I saw this idea with ribbon and thought it would be nice if I used my designer paper scraps. The words "big" and "you" are from the set Short and Sweet. They originally say "Wish Big" and "Thank you" I used the marker to get just the section that I wanted.
Stamps:Short and Sweet, Headline Alphabet
Paper: So Saffron, Petals and Paisley, Always Artichoke, Tempting Turquoise, Whisper White, Pretty in Pink
Ink: So Saffron, Always Artichoke, Tempting Turquoise, Pretty in Pink, Basic Black
Accessories: Scallop Punch, Brass Jumbo Eyelet, Crop-a-dile, 1 3/8" circle punch, 1 1/4" circle punch, Tool kit for piercing, White gel pen, Apricot Grosgrain, Snow Blossom Punch

Friday, October 05, 2007

Grateful Quilt


Once again life got in the way. The kids had an early dentist appointment yesterday. We drive an hour one way for that and with 5 kids we make the day of it. Our Home school group had a trip to a fire department this morning and then a picnic lunch at the park. By the time we got home I had to run one of my son in for band lessons. The joy of bing a Mom!! Thankfully the challenges for yesterday and today were simple enough to combine to on card. Yesterday's challenge was the Ways to Use It Challenge. We were suppose to use the twill tape. I seem to always grab the ribbon which is kept in the same place as the twill. I need to use it more. Today's challenge was the Limited Supply Challenge. It was to use some designer paper. We could use any embellishment or paper but he only stamps we could use was a sentiment. So this is what I came up with. I was going for a quilt look. It was rather easy. I just used the 3/4" square punch to get the squares and thankfully I had the right amount of colors to make one row across. Off to yet another event tonight...someday I may get to stay home!


Stamps: So Many Sayings Hostess set
Paper: Basic Black,Prints DSP-Almost Amethyst, Soft Sky, Certainly Celery, Rose Red, So Saffron
Ink: Basic Black
Accessories: Twill tape, Soft Sky Double Stitched Ribbon, Purely Pomegranate Double Stitched Ribbon, Apricot Appeal Grosgrain, Certainly Celery Grosgrain


Wednesday, October 03, 2007

Embossed Trees


This card was made for today's Sketch challenge. These challenges are a great way to make you think further. I think they have really helped me come up with layouts I would of never thought of myself. I'm still trying to use more of the wide grosgrain so that helped me decide what colors I wanted to use. I cut it all out first, besides the tab. After I decided my colors I thought this had to be a guy's card. Then I found a set that would match the sketch and went from there. The trees and HB are embossed and the HB is on a pop up glue dot. I used the spritzer and Bravo Burgundy marker to speckle the background

Stamps: Weathered Background, Party Punch Hostess Set, Lovely Like a Tree
Paper: Bravo Burgundy, Chocolate Chip, Always Artichoke
Ink: Chocolate Chip Craft and Classic, Burgundy marker
Accessories: Spritzer, Bravo Burgundy Wide Grosgrain, Twine, Burgundy Button, Clear Embossing Powder, Cutter kit on edges, 1 3/8" Circle Punch, Designer Label Punch

Tuesday, October 02, 2007

Thank You Blooms


Last night I spent the night with my 2 older boys and our Home Educators group dissecting rats. I hope to get pictures up there later this week. So this morning we needed a thank you card big enough for our group to sign. This is a full piece of card stock folded in half. I went to SCS to check out the Color Challenge for the day. So I went from there. The flowers are popped up on Glue dots.

Stamps: Party Punch Hostess set, Baroque Motifs, Watercolor Vine, All in a Row
Paper: River Rock, Chocolate Chip
Ink: River Rock, Chocolate Chip, Blue Bayou
Accessories: Wide Chocolate Chip Grosgrain, Ticket Corner Punch, Blue Bayou Double Stitched Ribbon, Designer Label Punch, Jumbo Eyelets, Scalloped Circle Punch, Twine

Monday, October 01, 2007

Re-do card


Today's Technique challenge on SCS was to take an already designed card and just change the stamp set. I had designed the cowboy one for last month's stamp night. I have the bad habit of over cutting and had a lot of extra left over. This was a great challenge for me.

Stamps: 1st-Baroque Motifs, 2nd-Sanded BG, Bronc Buster, Define Your Life
Paper: Soft Sky, Blue Bayou textured and non, River Rock, Soft Sky Prints DSP
Ink: Soft Sky, Blue Bayou
Accessories: Ticket Corner Punch, Jumbo Eyelets, Twine, Designer Label Punch, 1 3/8" Circle Punch, Double Stitched Blue Bayou Ribbon

Friday, September 28, 2007

Fall Pin


Today I did a challenge to do a paper pin. I've always wanted to make one and am so glad this challenge was posted. I stamped the image with black staz-on ink on Whisper white paper. I colored it with re-inkers and aqua pens. After I had cut out the top image I sealed it with versamark and clear embossing powder. I then put 3 layers of Chocolate Chip Cardstock underneath it. I glued them together with Crystal Effects. When they had dried enough to stick together I cut the Chocolate chip to the same shape as the top. I then sealed it one more time with Versamark and Crystal Embossing Powder. I did the same to the back and adhered the pin with Crystal Effects.
Stamps: Thankful Season
Paper: Chocolate Chip, Whisper White
Ink: Black Stazon, Certainly Celery, Old Olive, Pumpkin Pie, Creamy Caramel, Ruby Red, So Saffron, Apricot Appeal, Bashful Blue, Versamark
Accessories: Crystal Effects, Crystal Clear Embossing Powder

Wednesday, September 26, 2007

Cracked Triptych


This is for today's Sketch Challenge on SCS. This also worked out perfect. Last night when I went to bed I said I wanted to use more of the wide grosgrain ribbon on a card. It seems I always grab the Chocolate and the rest have not been touched. So this sketch gave me the perfect opportunity to use the wide ribbon. I just had to choose the color. I choose the color, cut all the paper and then decided which set to use. I wish the main image would of stayed to true color, but I guess I can't have it all.

Stamps: Baroque Motiffs, Holy Triptych
Paper: Real Red, River Rock
Ink: Real Red, Versamark
Accessories: 5/8" Real Red Grosgrain, Red Eyelets, Glassy Glaze Embossing Powder, Photo Corner Punch
Techniques: Cracked Glass

Tuesday, September 25, 2007

Pirate Birthday


Another simple card. I received a wonderful surprise package in the mail. It was full of little gifts and 3 sets of wonderful stamped images. It made my day!! When I saw the color challenge today the first thing I did was go through the images to see what I cold use today. I love this set and may have to break down and buy it. Thankfully my secret friend sent me enough images to keep me happy for a little while :) I used Crystal effects on the sword to give it some shine. I had to use the eyelets since today's colors (More Mustard, Old Olive, Bashful Blue) are colors in the earth elements assorted pack. Another tent card. I grabbed my scrap bag and this was the size I had already cut, so I went from there. I think it worked great with the already stamped image. The words are embossed. I colored with Re-inkers and Aqua Pens.
Stamps: Ahoy Matey, Print Pattern, It's Your Birthday
Paper: Whisper White, More Mustard, Old Olive Craft and Classic
Ink: More Mustard, Old Olive, Bashful Blue, Blush Blossom, Basic Black
Accessories: More Mustard Eyelets, Old Olive Eyelets, More Mustard Grosgrain, Corner Rounder, Clear Embossing Powder, Crystal Effects

Monday, September 24, 2007

Double Sanded


Well, today has been a busy one! I had used this idea of stamping the Sanded background in 2 different colors. I turned the stamp the opposite way before I stamped it the second time. Once again I am trying to keep my cards simple so they can easily be duplicated.

Stamps: Sanded Background,Bronc Buster
Paper: Wild Wasabi, River Rock, Chocolate Chip
Ink: Wild Wasabi, Chocolate Chip
Accessories: Wide Chocolate Chip Grosgrain, Gold Brad, Ticket Corner Punch

Friday, September 21, 2007

Baby cards

I was informed yesterday that my son's band teacher's wife went into labor yesterday. They were not sure if it was a boy or girl yet. I was asked to make a card for all the home-school band student to sign. So I did one of each.
Boy Card
Stamps: Sanded, Wild About You, So Many Sayings (Hostess set), All in a Row, Headline Alphabet
Paper: Soft Sky, Blue Bayou, Whisper White,
Ink: Soft Sky, Blue Bayou, Versamark
Accessories: Soft Sky Double Stitched Ribbon, Blue Bayou Double Stitched Ribbon, Hologram Highlights Embossing Powder

Girl Card
Stamps: I'm Here, Sanded, Sanded, So Many Sayings (Hostess set), Headline Alphabet
Paper: Pretty in Pink, Whisper White, Apricot Appeal
Ink: Apricot Appeal, Pretty in Pink, Versa mark (It's a girl is embossed)
Accessories: Clear Embossing Powder, Hologram Highlights Embossing Powder, White Grosgrain, Pink Gingham

Thursday, September 20, 2007

Elephant never forgets


When I saw this mornings Ways to Use it challenge I was excited. I love the new Basic Gray but forget to grab it. The challenge was to use the basic gray. This card did not want to work this morning but I think all the errors made it great! First I stamped the elephant. The image looked even but turned out spotty. I toyed with the thought of re-stamping it but the more I looked at it the more I liked the grain on the elephant. So then I decided to tie the ribbon on the front layer after I had already glued it down. So I peeled up one end and tied on the ribbon. Not until I went to glue the elephant on did I notice I pulled up the top and not the bottom. The more I looked I thought...ok, different is good! I am in a simple mood since school started and I have all 5 of my kids doing school. So time is not as available to do more, but I want to do something! I stamped the words in Cameo and tipped the edges in Basic Gray. I put a rhinestone from the pretties in the center of the flower.
Stamps: It's Your Birthday, Wild About You
Paper: Cameo Coral, Basic Gray, Whisper White
Ink: Basic Gray, Cameo Coral, Garden Green
Accessories: Rhinestone Brads from Pretties Kit, Basic Gray Taffeta, Tool Kit for Piercing


Wednesday, September 19, 2007

9/19 Sketch Challenge


Well, here is the sketch and my card for the Sketch challenge today. I had to keep it simple as my son is having his birthday party today. Weekends are full with football games and Wednesday between band and church is the only available time...life is full!! So here is my simple sketch card for today. I use the piercing template to put holes so my eyelets are spaced right. I then use the Crop-a-dile to punch the holes and set the eyelets.

Stamps: All in a row, Sanded, Monkey Business, So Many Sayings (Hostess set)
Paper: Chocolate Chip, Creamy Caramel
Ink: Chocolate Chip
Accessories: Creamy Caramel eyelets, Crop-a-dile, Jumbo Eyelet, 5/8" Chocolate Grosgrain

Tuesday, September 18, 2007

Fall Birthday


Ever since I got this set I am in the mood for fall cards. For those who know me I love summer. I love hot. So in Wisconsin when fall comes I know the hot is over, but I love the fall colors. I wish we could have fall colors in the summer heat. Oh, well...I guess God wants me to appreciate all the seasons as He has made them. When I looked at the Color Challenge today on SCS I was thinking "This will be drab together." I started by thinking of the layout I wanted to use and then knew which set I planned on going with. I tried a few different ribbons and thought the wide grosgrain went the best. The HB (Happy Birthday) in the center was added as an after thought. I think it works! I do like the way it turned out after all!

Stamps: Weathered Background, Autumn Harvest, It's Your Birthday, All in a Row
Paper: River Rock, Really Rust, Chocolate Chip
Ink: River Rock, Really Rust, Chocolate Chip
Accessories: 5/8" Chocolate Chip Grosgrain, Pop Up Glue Dot

Monday, September 17, 2007

Bleached Doodles


So the challenge today as to use heat embossing on a card and keep it simple. One of my favorite things to do with outlined embossed objects is color them in with bleach. I pour some bleach in one of my Aqua pens and just color between the lines. I am always surprised at what color it may turn into. For example I expected this to just go lighter blue. I was going to accent with the Soft Sky. It turned out a slight reddish color when bleached, so I went with the Purely Pomegranate. The ribbon is just glue dotted around the top layer and the 3 ties are tied on. That is an easy way to save some ribbon.

Stamps: Doodle This, It's Your Birthday
Paper: Purely Pomegranate, Blue Bayou
Ink: Versa Mark, Blue Bayou
Accessories: Aqua Pens, Bleach, Purely Pomegranate, Blue Bayou Double Stitched Ribbon, Scallop Circle Punch, Clear Embossing Powder

Friday, September 14, 2007

Teal Cowboy


Since today's schedule is pretty full, I went back and fixed the card I had made on Tuesday for the Color Challenge. The colors are Taken with Teal, Always Artichoke and Purely Pomegranate. At first I had more pomegranate but it just did not jive. So I toned it down and like it enough that it went in the mail yesterday to wish someone a Happy Birthday. I had put the jumbo eyelet in and thought it needed more color so I added the Rhinestone brad. I think it balanced very well. The 1 3/8" circle punch fits perfect as a highlight for the Designer label punch. The background is wheeled in both Artichoke and Teal. The cowboy is embossed and on Dimensionals. The HB is on Pop up glue dots.

Stamps: Rough Texture jumbo wheel, Bronc Buster, Party Punch
Paper: Always Artichoke, Taken with Teal, Very Vanilla
Ink: Always Artichoke, Taken with Teal craft Ink, Purely Pomegranate
Accessories: 1 3/8" circle Punch, Designer Label Punch, Twill Tape, Purely Pomegranate Double Stitched Ribbon, Always Artichoke 1/4" grosgrain ribbon, Jumbo Eyelet, Square Ice Rhinestone Brad, Clear Embossing Powder, Dimensionals, pop up glue dots, tool kit

Thursday, September 13, 2007

Belated Birthday


I just got this set (Elementary Essentials) yesterday. It is part of this month's SU special. You can get it for $19.57 with any $30 purchase. If you can tell I am using eyelets more. Since I bought the crop-a-dile I had to by more eyelets, ok, all of the eyelets.... They are so simple to add now! This card was made for the SCS Ways to use it challenge. The challenge was to Spiral it. The pencil was smooshed in the Versamark and embossed over with Clear embossing powder.
Stamps: Elementary Essentials, On the Spot Background, It's Your Birthday
Paper: Night of Navy, Bordering Blue, Whisper White, Real Red
Ink: Bordering Blue, read Red, Apricot Appeal, Going Gray, Pretty in Pink, Versamark
Accessories: Spiral Punch, Night of Navy Eylets, Crop-a-dile, Clear Embossing Powder

Wednesday, September 12, 2007

Birthday Wishes


Well, now is when the big birthday rush hits. I have 2 in my house in from Sunday to Thursday and 5 others just on the 14th, 15th & 16th of friends or family. A majority is guys so I tried to make them masculine. The sketch came from today's Sketch Challenge on SCS. It is a sketch I will use again!

Stamps: Starstruck, Sanded Background, Star Studded Season, Define your life
Paper: Always Artichoke, Pumpkin Pie, Sahara Sand
Ink: Sahara Sand, Pumpkin Pie
Accessories: Pumpkin Pie Grosgrain, Apricot Appeal Grosgrain, Antique Brads, Ticket Corner Punch

Tuesday, September 11, 2007

Pumpkin Tent Card

Sorry, I'm behind! We started school yesterday and all 5 kids are in this year. So I have 2 kindergarteners, a 2nd grader, a 6th grader and an 11th grader. I hope to still post as often but forgive me if I get behind once in a while .

SmileyCentral.com


So I tried the color challenge on SCS today and I did not like my results. So I decided I would work on a design for my next weeks Stamp Night. It is so cold and windy today that I decided a fall card would be nice. This is a tent card. The card base is a 4.25" x 8.5" folded in half. The topper is positioned just high enough to reach the 5.5" to make it the size of a regular invitation sized card. I started by stamping the bottom center pumpkin and masking it and adding the side ones. The topper I started with the gourd, masked it, stamped the large pumpkin, masked that and the stamped the small pumpkin. I watercolored with re-inkers and an Aqua pen. I tied the ribbon on and decided it still needed more so I added the eyelets. (Have I said I love the Crop-a-dile!)
Stamps: Holidays and Wishes, Autumn Harvest
Paper: More Mustard, Pumpkin Pie, Very Vanilla
Ink: Pumpkin Pie, More Mustard, Old Olive, Black Stazon
Accessories: Chocolate Chip Taffeta Ribbon, More Mustard and Old Olive Eyelets, Corner Rounder

Friday, September 07, 2007

Wishing Star


Well today I did not use a challenge on SCS, shocker. I needed a specific kind of card and wanted to use some of the Pattern Print designer paper. I wanted to keep it simple too. So this is what I came up with. I made the brackets with the round tab punch. I started with the colors I wanted, made the layout, choose my stamps and went from there.
Stamps: Starstruck, Star Studded Season, Define Your Life
Paper: Old Olive, Certainly Celery and Rose Red Prints Designer Paper, Very Vanilla
Ink: Purely Pomegranate, Old Olive, Certainly Celery
Accessories: Round Tab Punch, Ticket Corner Punch

Wednesday, September 05, 2007

Celery Bronco

Sorry I have had company for the last few days. As much as I missed stamping and blogging I really enjoyed spending time with my mother. It is very rare that she can get a few days to come and spend. So I took as much time with her as I could.
My son needed a card for a friends birthday next week. So off to check out the challenges I missed so far this week. Today's sketch challenge grabbed me (as it usually does) and I had to go with that. I did not notice that I had grabbed the wrong ink until I posted. It does not look too far off, so it will stay. The words and star are in Always Artichoke and I had intended them to be Old Olive. I had made it fast and had to shoot and run, my 6th grader had to be at band. I used the Prints designer paper on page 173 and stamped the Sanded background on it. I think I should just leave that background on my desk and stop putting it away! I used the 5/8" Old Olive Grosgrain and put the 1/4" on each edge.

Stamps: Sanded Background, Bronc Buster, Define Your Life
Paper: Certainly Celery, Prints Designer Paper Celery, Old Olive, River Rock
Ink: Old Olive, River Rock, Always Artichoke, Old Olive
Accessories: Jumbo Eyelets, Hemp Twine, 5/8" Old Olive Grosgrain, 1/4" Certainly Celery Grosgrain, Crop-a-dile, Designer Label Punch, 1 3/8" Circle Punch

Related Posts with Thumbnails