Monday, January 30, 2012

Genealogy Page


Yes, I am still working on my Mother's genealogy book.  I did not get it done in time for Christmas as a bunch of other projects came up and I had a big break that added many new pages. At this time the book is about 140 pages. I place all of the objects I want on the page and then I go back and decorate.  I try to keep things in a 2 page spread and I want the pages in the right order before I decorate.  All of the pages with the family trees have the same concept: same background, same size boys and girls and same layout (-design).  I smeared out the names here because they are present day and I do not feel right publishing their information. Once I put the medallion stamp on this page my daughter told me that I should add some bling.  When she came back and saw what I had done she LOVED it so I just had to share it (plus I haven't posted any MDS in quite a while even though I have been getting about 4 pages done a night).  To add the color behind the flower I just added circle punches, colored then in and then moved them back to be behind the stamp.


Details: MDS


Photobucket

Friday, January 27, 2012

Buehner Name Frame

Another last minute Christmas gift.  I can never go wrong with a personalized gift.  I knows that she loves shimmer and bling so I tried to add as much as I could without going overboard.  The top Awning is sprayed with the Shimmer paint/ Rubbing Alcohol Solution. The letters were sponged to add a bit of a vintage touch. 

Details:
Stamps: None
Paper: Mocha Morning DSP, Basic Black, Cherry Cobbler. Crumb Cake, Garden Green
Ink: Sponging: Crumb Cake, Cherry Cobbler
Accessories: Big Shot, Serif Essentials Alphabet Dies, Naturally Serif Alphabet Die, Basic Rhinestones, Flowers  from the Itty Bitty Shapes Punch Pack, Leaves from the Bird Builder Punch, Finial Press Impressions Folder, Tasteful Trim Die, Shimmer Spray, Cherry Cobbler Scallop Dots Ribbon, 1/4" Basic Black Grosgrain Ribbon

Photobucket

Friday, January 20, 2012

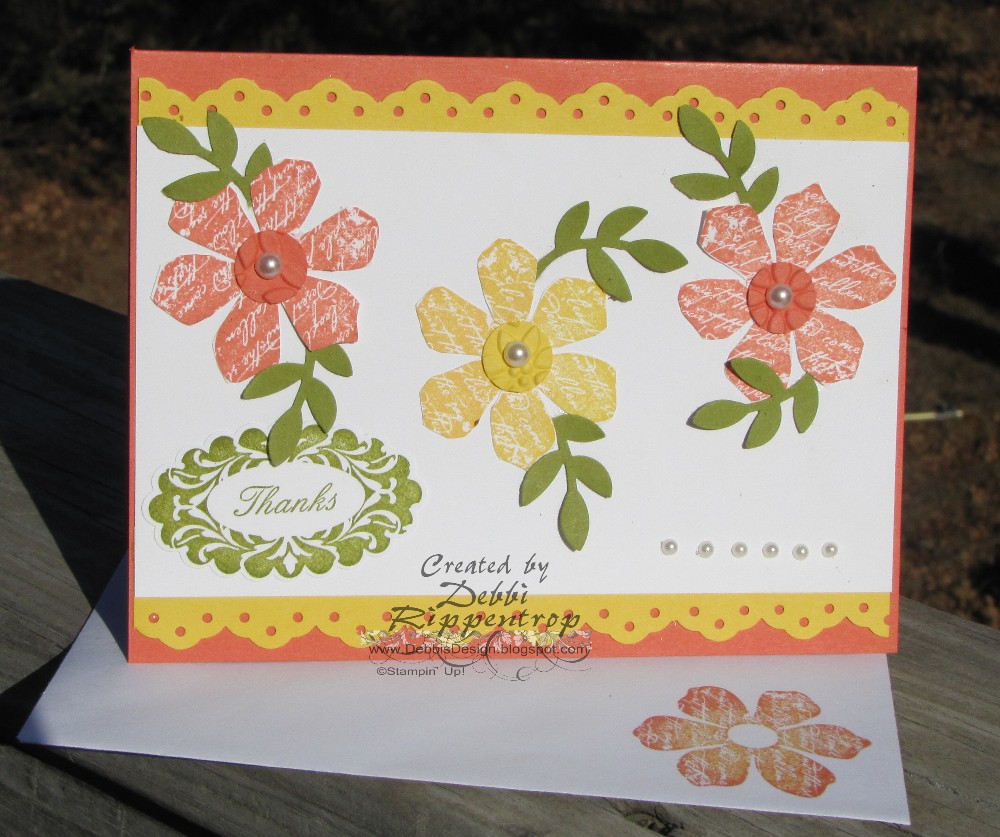
Cajun Flowers

A quick thank you card I needed to make up for an order.  The flowers where stamped and then cut out. The edges where curled just a bit.

Details:
Stamps: Vintage Vogue, Perfect Punches
Paper: Calypso Coral, Daffodil Delight, Whisper White. Lucky Limeade
Ink: Crumb Cake, Versa Mark, Early Espresso
Accessories: Leaves from the Bird Builder Punch, Eyelet Border Punch, Scallop Oval Punch, Basic Pearls, 1/2" Circle Punch, Big Shot, Elegant Bouquet Impressions Folder


Photobucket

Friday, January 13, 2012

Logan Name Frame


This one was done a while back for a gift for  a family who had just been blessed with the adoption of a little boy. The circles were done by punching the smaller one first and getting an outline with the punch of a larger one.
Details:
Stamps: None
Paper: Well Worn DSP, Not Quite Navy, Crumb Cake, Early Espresso
Ink: None
Accessories: Big Shot, Serif Essentials Alphabet Dies, Fun Flowers Die, Naturally Serif Alphabet Die, Houndstooth Impressions Folder, Early Espresso Grosgrain Ribbon, 3/4" Circle Punch, 1" Circle Punch

Photobucket

Friday, January 06, 2012

Eagle Birthday


This is a go to set for me when it comes to masculine cards, and most of the men in my family loves wildlife so it fits them too. To do the leaves I just stamped them in the lighter colors and used a marker to outline and put a few spots in the center, very simple yet gives a great effect.

Details:

Stamps: In Wilderness, French Foliage, Bring on the Cake 
Paper: Early Espresso, Very Vanilla, Cajun Craze
Ink: Cajun Craze, Crumb Cake, Peach Parfait, Early Espresso
Accessories: Extra Wide Oval Punch, Postage Stamp Punch

Photobucket

Friday, December 30, 2011

Kayla Name Frame


I can't believe my daughter had one more friend who had not received one of these name frames as a gift yet (Lol).  When we were still in our gift planning stage my daughter mentioned that Kayla said that she would love one of the frames for Christmas.  Her favorite colors are blue and purple so that is where we started. My daughter pulled out the Color Coach and started matching colors with the DSP that I had on hand. This one is retired (I thought I had used it all up) I had just gotten the Fun Flowers die so I just had to use it.  I always enjoy making these and this one was very fun to do.

Details:
Stamps: None
Paper: Retired DSP, Wisteria Wonder, Concord Crush, Pear Pizzazz
Ink: None
Accessories: Big Shot, Serif Essentials Alphabet Dies, Fun Flowers Die, Naturally Serif Alphabet Die, Basic Rhinestones, Scallop Trim Border Punch, Scallop Trim Corner Punch, Flowers and Circle from the Itty Bitty Shapes Punch Pack, Leaves from the Bird Builder Punch, Designer Printed Brads, Finial Press Impressions Folder

Photobucket

Wednesday, December 28, 2011

Fireplace Stockings


This card was CASED from Betty.  I love that so many of SU punches can make other things.

If you love the Stocking Builder Punch as much as I do then you must put it on your next order. Once the current inventory of this punch has been depleted, it will no longer be available for purchase. It WILL NOT be carried over into the next Idea Book & Catalog.

Card Details:
Stamps: Tiny Tags
Paper: Crumb Cake, Early Espresso, Daffodil Delight, Basic Black, Riding Hood Red, Well Worn DSP
Ink: Early Espresso
Accessories: Big Shot, Square Lattice Impression Folder, Word Window Punch, Bird Builder Punch, 2 1/2" Circle Punch, Stocking Builder Punch


Photobucket

Monday, December 26, 2011

Stick Horse

One of the reasons I had to have the Stocking Builder Punch was to make this cute stick horse. The banner is sprayed with Shimmer spray.  One of the fun things that will be available in just a few short weeks (January 4th) is the Framelit Dies.  I pre-ordered one of them just to see what they were like and they are great so the other is on my order for when SAB starts. I used a skewer stick for the pole.

If you love the Stocking Builder Punch as much as I do then you must put it on your next order. Once the current inventory of this punch has been depleted, it will no longer be available for purchase. It WILL NOT be carried over into the next Idea Book & Catalog.

Card Details:
Stamps: Curly Cute
Paper: Rose Red, So Saffron, Whisper White, Pear Pizzazz, Pocketful of Posies DSP
Ink: Rose Red
Accessories: Big Shot, Vintage Wallpaper Impression Folder, Perfect Polka Dots Impression Folder, Socking Builder Punch, Labels Collection Framelit Die, Hemp Twine, Circle Fire Rhinestone Brads


Photobucket

Friday, December 23, 2011

Merry Christmas


My Husband asked me this year as I was rushing, once again, to finish my cards and get them in the mail for Christmas why I can't just keep them simple.  My 9 year old daughter turned to him and replied "Dad, for Mom that is simple."  

I guess I always love to make special cards for special people on their birthdays and Christmas is the celebration of the birth of my Saviour, so the Christmas cards I send out are His birthday cards.  He is the most special person in my life so I feel it necessary to make him a special birthday card.

I do have a tutorial somewhere on how to make the perfect circle outline with the Circle Scissors Plus and will try my best to remember to put it up once things slow down after the holidays.

I wish you all a very Merry CHRISTmas and pray that you have all accepted Christ as your Saviour and are enjoying the true meaning of Christmas.


Details:
Stamps: The Sounding of Joy
Paper: Early Espresso, Very Vanilla, Mocha Morning DSP, Brushed Gold
Ink: Crumb Cake, Versa Mark, Early Espresso
Accessories: Big Shot, Northern Flurry Impression Folder, Lace Ribbon Border Punch, Circle Scissor Plus, 2-1/2" Circle Punch, Gold Embossing Powder, 1/8" Early Espresso Taffeta Ribbon, Champagne Mist Shimmer Paint/Rubber Alcohol Spray


Photobucket

Wednesday, December 21, 2011

Stocking Punch Gift Tags


So do you have all of your gifts wrapped and ready to go?  My kids have been begging every day if they can open just one.  I am holding out (it is a good chore encouraging tool). They have had their hands on all of the gifts that have their names on them and they think they have them all figured out.  I am one of those sneaky moms who hate it when the kids guess the gifts before hand.  Last year I put no names on them at all, just numbers.  When they were handing out the gifts I had a list and told them which person got which numbers. I did mess up and my son ended up with a pink Barbie Volkswagen and my daughter got a CSI kit. I am always good for a laugh. This year I put names on them (but none of them have the right names...shhh!) I made these cute and easy gift tags to put on all of our gifts this year.  I folded my DSP in half and and lined up the punch right below the fold. It worked pretty spiffy.

If you love the Stocking Builder Punch as much as I do then you must put it on your next order. Once the current inventory of this punch has been depleted, it will no longer be available for purchase. It WILL NOT be carried over into the next Idea Book & Catalog.
Photobucket

Monday, December 19, 2011

Family MDS Picture


These are my wonderful children. I am blessed to be their Mother (Mother-in-law and Grandma) I do make my cards (which you will see on Friday) and I try to include a picture that coordinates with the card.  I do my family picture-card in MDS.  Since my cards are A2 size (4.25" x 5.5") and I use an invitation envelope to send them in I have to make sure my pictures are the same size.  I have them printed in a 4" x 6".  As you can see I left the bottom 1/2" blank.  That way I can just cut off the blank part and drop them in the envelope. In MDS I use a square punch and set it to the 4" x 6" size.  I color it so I do not loose it.  I then create another punch and layer it directly over top of it leaving the 1/2" short.  Then I decorate the area I have left.  I connect them and drag the corner out to be as large as it will allow me to work on.  After I have them just how I want them I export them in a jpeg and crop them to the right size in my photo editing program.  They are then all set to be sent to my local photo printing store for printing.
Photobucket

Friday, December 16, 2011

Dragon Punch Art

I found this little guy on Lyssa's blog.  I had him filed away for a special occasion and today was just that day.  He was so fun to make and quick and easy too.

Card Details:
Stamps: Short and Sweet
Paper: More Mustard, Whisper White, Basic Black, Lucky Limeade, Pool Party
Ink: Pool Party, Sponging: More Mustard, Lucky Limeade, 
Accessories: Big Shot, Square Lattice Impression Folder, 2-1/2" Circle Punch, Extra-Large Oval Punch, Large Oval Punch, 1/2" Circle Punch, Circle Punch from Itty Bitty Shapes Punch Pack, 5-Petal Flower Punch, Pennant Builder Punch


Photobucket

Friday, December 09, 2011

Easy Polka Dot Flowers

I know we are in the middle of winter and it is no time for flowers.  I had made this card quite a while back and forgot to post it, so no better time like the present.  I had a request for a simple card from a Sunday School teacher to send to a student who has been absent.  The stamp says "i miss you" but since they wanted it from the class which should be "We" I decided to just have it say "miss you" .  I inked the stamp up with a marker so I only got the words that I wanted to use.  I took this idea from page 98 in the catalog. It was simple a cute, just what I was looking for.  :-)


Card Details:
Stamps: Vintage Vogue, Three Little Words
Paper: Whisper White, Calypso Coral, Wisteria Wonder
Ink: Calypso Coral, Wisteria Wonder, Lucky Limeade
Accessories: Simply Scored Scoring Tool, Decorative Label Punch, In Color Designer Printed Brads

Photobucket

Thursday, December 08, 2011

Fun Flowers

I have had orders coming in left and right and no time to use any of the new products so I got up early this morning and got my chores finished so that I could take a few minutes and make a card that is to go out in today's mail. I made sure to use as much of my new stuff as I could fit in. The Adorning Accents Embossing folders are soo cute. I did not order the matching Edgelits Dies yet but they will be on my first order next month! Another thing that will be on my next order is the rest of the pleated ribbons.  They are so much nicer in real life than the picture could ever show.  They will be just adorable on any baby card! Here I sponged the edged of the flower and spritz the bottom of the card and the flower with Champagne Mist/ Rubbing Alcohol solution spray. I have spent all of my extra time today so back to work I must go (still working on those Christmas cards...)

Card Details:
Stamps: Curly Cute
Paper: Early Espresso, Blushing Bride, Pear Pizzazz, Sahara Sand
Ink: Early Espresso, Blushing Bride-Sponging
Accessories: Big Shot, Adorning Accents Impression Folder, Fun Flowers Die, Bird Builder Punch, 1/2" Circle Punch, Circle Punch from the Itty Bitty Shapes Punch Pack, Basic Pearls, Champagne Mist/ Rubbing Alcohol Solution Spray, 3/8" Blushing Bride Pleated Ribbon

Photobucket

Friday, December 02, 2011

Mocha Morning Butterflies

So being that I have been spending so much time working on my Christmas card and gifts I stock piled some cards to post at a later date.  So even though butterflies are not seen very often in December I do love them in fall colors in which I made this card.  One day when we were on a long road trip I had time to sit and look through the catalog.  I made a long list of cards that I wanted to make that looked quick and easy.  I took this idea from page 152 in current the catalog. The sentiment that I used was just too short for the punch I wanted to use so I decided to fold over an edge.  Simple, easy card to throw together quick!


Card Details:
Stamps: Teeny Tiny Wishes
Paper: Soft Suede, Crumb Cake, Very Vanilla, Mocha Morning DSP
Ink: Soft Suede
Accessories: Eyelet Border Punch, Modern Label Punch, Big Shot, Finial Press Impression Folder, Beautiful Butterflies Die, Basic Rhinestones


Photobucket

Monday, November 28, 2011

Heritage Book-Family Record Page MDS


I am still plugging away at my Mother's Heritage book.  It may not make it for Christmas.  Since she wanted it right up to the day I send it to the publisher I thought that I would need to include a page or two for her to write any additional births or marriages.  I found the top part as an image in a Google search.  I added a punched squared background and matched it to what was already behind the image so that it blended.   For the corners I wanted something ornate.  So I opened my photo editing program, brought in the Frame It Stamps and cropped a few corners and sides.  I then saved them right back in the same folder with a slight change of the file name.  I was then able to open them just like any other stamp in MDS and alter them just like normal.  The lines I also created in my photo editing program (Microsoft Picture it) saved it as a png file in  the Frame It folder and I was able to alter the color to match once I placed it on my page.  So if there is ever a stamp in MDS that you just want a part of, you don't have to mask it, make it work for you! (If you do accidentally save it without changing the name after altering it, you may have to re-install or re-download)
Photobucket

Monday, November 21, 2011

MDS Monday-Heritage Book

One thing I get stuck in a rut with when doing the heritage book is what to journal on.  I have soooo many census and immigration sheets and write out what they say, since they sometimes can be hard to read.  Here I layered a bunch of oval punches (since they seemed to match the background pattern. )After I had them how I wanted them, I grouped them together and added a drop shadow.  Then I threw a couple of antique brads on the end.  I think it had a cool look to break up the monotony of all of the charts.  Now to get this book done and sent it to print before Christmas gets here....
Photobucket

Friday, November 18, 2011

Happy Rhinestone Birthday

These colors are sooo out of my norm but when I was going through the catalog and I saw the cute card on page 168 I wanted to keep it bright and cheery.  I used the color wheel to decide what colors I wanted to use.  There are so many different avenues to get inspiration from.  

Card Details:
Stamps: Bring on the Cake
Paper: Whisper White, Real Red, Daffodil Delight, Pacific Point, Pumpkin Pie, Early Espresso
Ink: Real Red, Daffodil Delight, Pacific Point, Pumpkin Pie, Early Espresso
Accessories: Big Shot, Elegant Bouquet Impression Folder, Scallop Trim Border Punch, Itty Bitty Shapes Punch Pack-Flower, Basic Rhinestones, Early Espresso Quilted Satin Ribbon

Photobucket

Monday, November 14, 2011

MDS Heritage Book

I am still working on my Mother's Heritage book.  Do you think I will get it done for Christmas?  Why is it that the month of November always seems to be the busiest month for me?  This is a page that I did with my Great-Great-Great Grandmother.  I love seeing these old pictures and reading about the history behind these wonderful people.
Photobucket

Friday, November 11, 2011

Velvet Chair


This card was a complete accident on my part so I guess it just designed itself.  I cut the paper for another card and did not like how it fell together so it just sat on my shelf for a few days until I decided that I needed to use it.  I love how the chair fit perfectly in the frame of the impression folder.  I embossed the chair to give it some dimension since the paper flowers are a velvet.  I think the 2 1/2" circle punch is a perfect backing for the frame.  Now if we only have an oval punch that fit it so I did not have to cut it out. Lol

Card Details:
Stamps: Have a Seat
Paper: Crumb Cake, Basic Black, Mocha Morning DSP
Ink: Versa Mark
Accessories: Black Embossing Powder, Big Shot, Vintage Wallpaper Impression Folder, Flower- Itty Bitty Shapes Punch Pack, Basic Pearls, Designer Frames Impression Folder, 2 1/2" Circle Punch, Basic Black Grosgrain Ribbon

Photobucket
Related Posts with Thumbnails