Friday, December 25, 2009

Merry Christmas 2009


Merry Christmas! I hope you are able to spend this day with loved ones. Today I want to share with you the card I sent out this year. I took the idea for the inside from the Catalog this year on page 31.  When I think of the word JOY I think of a song we used to sing in Sunday School as a child.  It was "Jesus, and others, and You what a wonderful way to spell JOY.  Jesus & others and you in the life of each girl and each boy. J is for Jesus for He has first place, O is for others we meet face to face. Y is for you in whatever you do.  Put yourself 3rd and spell. JOY."  So that is where I took the concept from the catalog.  I hope you have the JOY I sing about this Christmas in your life.
 

I had my family cranking away on the Big Shot this year.  My poor  Merry Deatils Sizzlits Die must have gone through over 1000 times.  It does look pretty rough but still works great. I know after making 100 of these, next years cards may end up being very very simple. ;)  I ran the 12" X 5.5" piece through the printer to get everything I wanted on the 4th panel first. Then I put my top border on and scored and folded.  I went through a few bottles of Tombow Multipurpose glue. ;)

Card Details Outside:
Stamps: Sanded Background, En Francias Background, Medallion Background

Paper: Certainly Celery, Always Artichoke, Whisper White
Ink: Ruby Red, Always Artichoke
Accessories: Big Shot, Movers & Shapers Die, Tag Corner Punch, 1/2" Circle Punch, Crop-a- Dile (for center hole in tag re-enforcer), Merry Details Sizzlits Die, Silver Elastic Cord, Word Window Punch, Modern Label Punch


Card Details Inside:
Stamps: Season Of Simple Grace
Paper: Certainly Celery, Always Artichoke, Whisper Whit, Ruby Red
Ink: Always Artichoke
Accessories: Big Shot, Scallop Edge Punch, Merry Details Sizzlits Die, 3/4" & 1" Circle Punch, Serif Essentials Alphabe Die, Perfect Details Texturz Plate, Backgrounds 1 Texturz Plate, Petals-a-Plenty Impressions Folder


Signature

Wednesday, December 23, 2009

Pop up Gift Card

Sorry that I missed MDS Monday this week.  My son surprised me and got to come home from college when he was not going to make it.  So I spent some quality time with him.  Today I HAD to make a card for a gift card that I have to deliver yet today.


Here is the card closed.

This is going to the gentleman who gives my son his special trombone lessons.  He is an ice cream addict so we got him a gift card so he can stock up.  I have wanted to make one of these cones for so long so this card gave me the chance.

This was soooo fun to make.  I dusted a Whisper White Craft sponge across the raised Thanks.  I sponged around the outside of the Very Vanilla with the Bashful Blue.  The ice cream and punched snow flakes where sprayed with Champagne Mist.

Card Details:
Stamps: Season Of Friendship
Paper: Cameo Coral, Certainly Celery, Bashful Blue, Chocolate Chip, Very Vanilla
Ink: Certainly Celery, Bashful Blue
Accessories:Scallop Circle Punch, Round Tab Punch, 3/4", 1" & 1-1/4" Circle Punches, Thanks Embosslit Die, Big Shot, Movers & Shapers, Scallop Trim Border Punch, Wide Chocolate Chip Grosgrain Ribbon, Perfect Polka Dots Impressions Folder


Signature

Wednesday, December 16, 2009

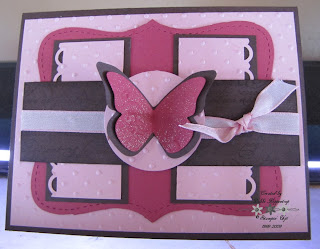
Embossed Butterfly


I had some problems finding good light today to take this picture.  I could not get the colors right, I wanted to show the shimmer spray on the butterfly, plus I wanted you to be able to see the embossed on the butterfly...Oh well, I hope you can imagine how this card looks in real life.  It is so pretty I just may never give this one away :). Not much energy today but the surgery went well and the pain is getting better.  Off to take another nap.  Happy Stamping!

Stamps: En Francais
Paper: Chocolate Chip, Pretty in Pink, Rose Red
Ink: Chocolate Chip
Accessories: Perfect Polka Dots Impressions Folder, Big Shot, Top Note Die, 1-3/4" Circle Punch, Beautiful Butterflies Die, Beautiful Wings Embosslit Die, Pretty in Pink Taffeta Ribbon, Scallop trim Border Punch, Champagne Shimmer Spray
Signature

Monday, December 14, 2009

MDS Christmas Picture


Sorry no tutorial today. I more than likely will be heading into the operating room when this posts. My gallbladder has decided that 15 years of attacks are enough and they have decided it has to come out. So I am sharing with you today the picture that I put together in My Digital Studio to send out with our Christmas cards. These are the 4 joys I have left at home (2 have flown the coop). My 14 yr old loves taking pictures and took some great ones of his siblings for me to include in this card. So hopefully I will be back on Wednesday to post some more. If you have any questions about anything in MDS post them in the comment section and I will get to them when I return.
Signature

Wednesday, December 09, 2009

Birthday Roses


e
Well, we received just over a foot of snow today so I did not have to run my kids anywhere and had the opportunity to sit down and do the Sketch Challenge. Of course I had to do a bright and cheery card since it is dark and gloomy outside. Plus I got the chance to use some of my new items coming up in the mini that will be out in January ;). I had to buy these 2 dies just so I could put the roses in the basket. Well I hope where ever you are that you stay dry and warm!

Stamps: Medallion Background, Think Happy Thoughts, Sanded Background
Paper: Chocolate Chip, Basic Black, Rose Red, Garden Green, Creamy Camel
Ink: Chocolate Chip
Accessories: Real Red Grosgrain Ribbon,
Techniques: Scallop Trim Border Punch, Beary Hoppy Die, Beary Lovely Die, 1-1/4" & 1-3/8" Circle Punches, Mat Pack for Piercing, Perfect Polka Dots Impression Folder


Signature

Monday, December 07, 2009

MDS Monday

Today I am going to go over a quick but easy concept of grouping. I love this option when I have added a few small elements and do not want to move each and every one one at a time.


So I have started with a stamped flower from the Always set. I have already put in the background paper and added a stitched stem. I would love to color this flower in so off we go....


I have now taken the oval punch and shrunk it down to fit the inside of a petal. After I changed the color then I then copied and pasted each one and placed it to fit over each one.


Now that I have them where I want them I DO NOT want them to move. So I have clicked each one while holding down the ctrl key. Once I had them all clicked I go to the navigation bar/arrange and choose group.


This will lock them all together. Now I just need to either go up to the layer in the navigation or hold down the shift + Ctrl button and click the arrow button down until it is how I want. it.


Now that I have the oval petal group behind the flower outline I am going to once again hold down the Ctrl button and add the flower outline to the grouping.


So now I can freely move the created colored flower around and not have to worry about all of the little pieces.


I have added a few more embellishments including some oval petals for my flower.


I hope this has given you something new to try on your MDS. Let's see what I can come up with next week! If you have any requests please post them here!


Signature

Friday, December 04, 2009

Noel


The last and final side to the blocks. I hope you have enjoyed all of the fun things as much as I have had designing and making them. I once again sprayed the Snowflake with the Shimmer Paint/Rubbing Alcohol mixture. They needed just a bit of sparkle. I do not think you can tell but I did run the designer paper behind the O through the big shot with the Perfect Details Texturz Plate. The E was the only thing on all of the sides that I did nothing too. I think with the business of the paper, it was enough.


Stamps: None
Paper: Merry Moments DSP, Christmas Cocoa DSP, Real Red, Old Olive, Soft Suede, Whisper White,
Ink:None
Accessories: Big Shot, Serif Essentials Alphabet Die, Real Red Grosgrain Ribbon, Sleigh Bells Ribbon, Merry Details Die, Square Ice Rhinestone Brad

Have a GREAT weekend!!
Signature

Wednesday, December 02, 2009

Love


So we are on to the 3rd side of my blocks. These are so fun to make and I can see many things to use them for. My daughter wants me to make one for her room with her name on it. I love the flocked paper I used underneath the L. I hated to cut it up, but I just needed to use it. The star was punched first with the small star and then with the large star. I cut a slit to slip it around the O. I love the library clips but they do not mail well, so I thought they would make a great addition to a craft, the same goes with the fluffier corduroy buttons. It is hard to see but I did also do some piercing on the corners of the E.


Stamps: None
Paper: Merry Moments DSP, Christmas Cocoa DSP,Real Red, Garden Green Chocolate Chip, Very Vanilla, Vellum
Ink: None
Accessories: Big Shot, Serif Essentials Alphabet Die, Double Stitched Chocolate Chip Grosgrain Ribbon, Sleigh Bells Ribbon, Heart from BAB Beary Girl Die, Large Star Punch, Small Star Punch, Filigree Designer Brad, Library Clip, Spiral Punch, Chocolate Chip Corduroy Button, Mat Pack for Piercing

Signature
Related Posts with Thumbnails